Home
8 Top-Rated Sidearms in Mortal Shell 2 Ranked for Every Build and Playstyle
In Mortal Shell 2, sidearms are essential tools for Resolve management and crowd control. The Naylshotte ranks among the top choices for boss encounters due to its "Fragile" debuff, while the Caged Hystrix is widely regarded as a premier option for clearing groups of enemies. For advanced players, the Gloom Sniper trick allows you to retrieve lost currency by shooting your "death stain" from a distance, significantly reducing the risk of permanent resource loss.
Why Sidearms Are More Than Just Backup Weapons in Mortal Shell 2
In the original Mortal Shell, ranged combat was a secondary consideration, often limited to the slow-firing Ballistazooka. However, Mortal Shell 2 has evolved this mechanic into a core pillar of combat known as the Resolve Economy . Sidearms no longer function as simple projectiles; they are an extension of your Shell's ability system. Every shot fired consumes Resolve, the same resource used for powerful weapon arts and Shell-specific skills, creating a tactical tug-of-war between melee aggression and ranged utility.
According to Fextralife's database , sidearms provide utility that melee weapons simply cannot replicate. This includes applying status effects like "Fragile" or "Frostbite," staggering heavy enemies from safety, and even manipulating the environment. Because Resolve is generated by landing melee hits, the game encourages a rhythmic flow: strike with your blade to build energy, then expend that energy through your sidearm to create an opening or finish a weakened foe.
This guide will explore the nuances of all eight sidearms, including the "Gloom Sniper" technique for currency retrieval and the "Smelting" strategy that allows you to pivot your build without wasting precious gold. Whether you are playing as the high-stamina Tiel or the tanky Proxima, understanding these synergies is key to surviving the game's brutal Night Mode.
Mortal Shell 2 Sidearm Tier List Ranked from S to C
Ranking sidearms in Mortal Shell 2 requires looking at more than just raw damage. We must consider Resolve efficiency, stagger potential, and how well a weapon complements specific Shell archetypes. Based on community testing and mechanical analysis, here is how the current arsenal stacks up.
| Sidearm | Tier | Resolve Cost | Primary Effect | Best Shell Synergy |
|---|---|---|---|---|
| Naylshotte | S | Low | Fragile Stacks | Solomon |
| Caged Hystrix | S | Medium | High Stagger | Proxima |
| Forgotten Crossbow | A | Low | Rapid Fire | Tiel |
| Triarch Repeater | A | High | Poise Break | Harros |
| Salvaged Trebuchaxe | B | Medium | Explosive AOE | Tiel |
| Troubadour's Lute | B | Low | Distraction | Any (Utility) |
| Cursed Child | C | High | Summoning | Solomon |
| Ballistazooka | C | Very High | Knockback | Eredrim |
Which Sidearms Dominate the S-Tier?
The S-Tier is reserved for weapons that are not only powerful but also versatile enough to fit into almost any build. These weapons often define the "meta" because they solve specific problems that players face throughout the campaign.
Why the Naylshotte Ranks Among the Top Boss Killers
The Naylshotte is often the first sidearm players acquire, but it remains a top-tier choice well into the late game. Its primary strength lies in the Fragile status effect. Each hit applies a stack of Fragile, which increases the physical damage the target takes from all sources. When combined with an Infibin Stone , the Naylshotte can apply up to seven stacks, effectively doubling your melee damage for a short window.
Expert players often use the "One-Shot Combo" in NG+ Night Mode. By equipping the Fusillade Stone and Blood Curse, you can fire a concentrated burst that applies maximum Fragile stacks instantly, followed by a heavy weapon art to delete boss health bars. As noted in community discussions , its low Resolve cost makes it the most efficient tool for maintaining high DPS during long encounters.
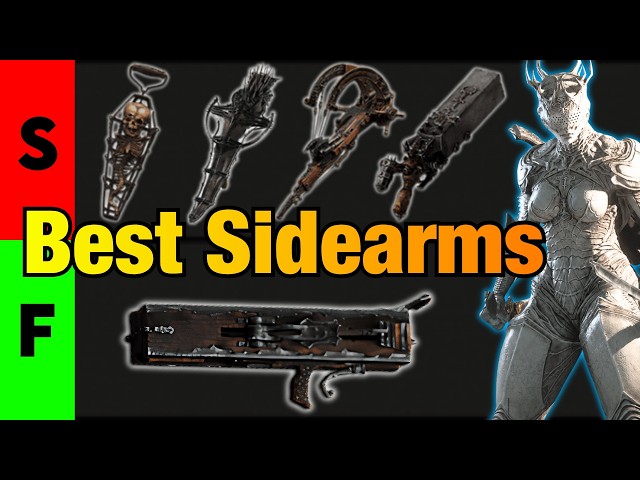
Image source: YouTube
Clearing Crowds with the Caged Hystrix
While the Naylshotte excels at single-target damage, the Caged Hystrix is a "stagger machine" designed for crowd control. It fires a spread of jagged metal that can interrupt the attack animations of multiple enemies at once. This is particularly useful in the cramped corridors of the Eternal Narthex or when being swarmed by Ghouls in the Fallgrim outskirts.
The Hystrix reaches its full potential when paired with the Proxima Shell . Proxima’s "Grafted Armor" ability restores a small amount of Resolve every time you deal damage. Because the Hystrix hits multiple times per shot, it can actually refund a portion of its own cost, allowing for a "machine gun" playstyle where you can fire almost continuously as long as you are hitting targets.
How to Use the Gloom Sniper Trick to Save Your Progress
One of the most frustrating experiences in Mortal Shell 2 is dying in a high-hazard zone or a boss arena and losing a massive amount of Gloom (the game's primary currency). Traditionally, you must run back to your "death stain" and physically interact with it to retrieve your lost riches. However, a clever mechanic discovered by the community—often called the Gloom Sniper trick—changes this entirely.
To perform this trick, simply aim your sidearm at the glowing purple/blue aura of your death stain from a safe distance and fire. Upon impact, the Gloom will be instantly added back to your inventory. This is a significant advancement in safety, as it allows you to recover your progress without re-entering a dangerous boss arena or platforming over lethal drops. The Forgotten Crossbow is a top choice for this technique due to its high projectile speed and minimal Resolve requirement, ensuring you don't waste resources just to get your money back.
Best Sidearm and Shell Synergies for Maximum Damage
Mortal Shell 2 rewards players who build their loadouts around specific mechanical interactions. Here are three high-performing synergies that can carry you through the hardest difficulties.
The Tiel and Trebuchaxe Stealth Bomber Build
Tiel is known for having the highest stamina but the lowest health, making him a "glass cannon." By using Tiel’s unique ability to enter stealth upon a non-perfect Harden, you can safely charge the Salvaged Trebuchaxe . The Trebuchaxe has a long wind-up time but deals massive explosive damage. In this build, you Harden to avoid an attack, turn invisible, and then unleash a 400+ damage explosion that almost always results in an instant stance-break on bosses.
The Proxima Machine Gun Meta
As mentioned earlier, the synergy between Proxima and the Caged Hystrix is exceptionally strong. By focusing your upgrades on Resolve Restoration , you can create a loop where the Hystrix generates enough energy to fuel its next shot. This turns a slow, methodical soulslike into a pseudo-shooter, allowing you to keep enemies permanently staggered while you chip away at their health from mid-range.
The Solomon Resolve Battery
Solomon has the largest Resolve pool in the game. This allows him to "bank" shots for his sidearm, firing off three or four Triarch Repeater rounds in rapid succession. While other Shells have to stop and engage in melee to reload their Resolve, Solomon can stay at range longer, making him a popular choice for players who prefer a caster-like playstyle using sidearm infusions as their primary source of damage.
Turning the Cursed Child into a High-Tier Necromancer Build
In many generalist tier lists, the Cursed Child is ranked near the bottom because its direct damage is lackluster and its Resolve cost is steep. However, this weapon is a specialized tool for a "Necromancer" playstyle that many players overlook. When you kill an enemy with the Cursed Child, it raises a spectral copy of that enemy to fight alongside you.
To optimize this build, you should focus on Phantom Infusions . These infusions extend the lifespan of your summons and allow them to apply status effects to your enemies. While it requires more setup than a standard Naylshotte build, having two elite enemies fighting on your side can trivialize some of the game's most difficult encounters. As Soul Kings' advanced guide points out, this weapon isn't "bad"—it simply requires a dedicated build to shine.
How to Upgrade and Smelt Sidearms Without Wasting Gold
Gold and Tarstones are rare in the early stages of Mortal Shell 2, leading to "resource anxiety" where players are afraid to upgrade a weapon they might replace later. The game solves this with the Smelting mechanic at the anvil.
When you smelt a sidearm, you receive a 100% refund of all gold and upgrade materials invested in it. This allows for risk-free experimentation. A common strategy is to max out the Naylshotte early to get through the first two temples, then smelt it to instantly bring the Triarch Repeater or Caged Hystrix to Level 9 once you find them in the mid-game. Note that expert players suggest stopping at Level 9 for most weapons, as the jump to Level 10 often provides diminishing returns for a very high cost.
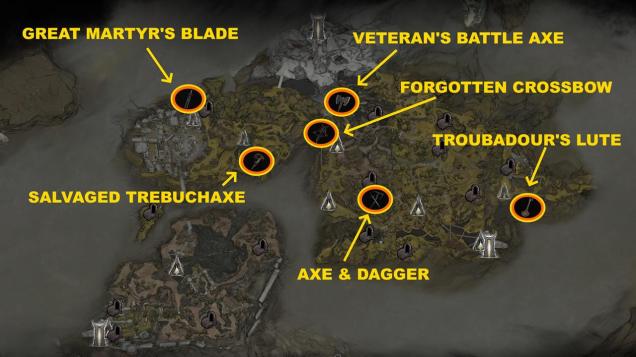
Image source: GameSpot
Where to Find All 8 Sidearms in Mortal Shell 2
If you want to complete your collection, you'll need to explore every corner of the world. Here is a quick checklist of where to find each sidearm:
- Naylshotte: Found in the starting area/Prologue. Do not skip the prologue, as it provides a significant head start in gold and XP.
- Forgotten Crossbow: Located in a chest behind the first Grisha mini-boss in Fallgrim.
- Caged Hystrix: Found in the Eternal Narthex, hidden behind a breakable wall near the second teleporter.
- Triarch Repeater: Awarded after defeating the Twin Martyrs in the Frozen Tundra.
- Salvaged Trebuchaxe: Located in the Abandoned Chamber, guarded by a group of venomous spiders.
- Troubadour's Lute: Purchased from the merchant Vlas for 5,000 gold.
- Cursed Child: Found in the Cathedral of Dim Light, in the secret room beneath the altar.
- Ballistazooka: Requires the "Tools" item found in the Seat of Infinity to repair the broken workbench in Fallgrim Tower.
Frequently Asked Questions
Resolve is primarily generated by landing successful melee attacks on enemies. You can also consume glowing effigies found throughout the world or use specific Shell abilities, like Solomon's passive Resolve gain, to keep your sidearm loaded. Some items, like the Boiled Frog, can temporarily increase your Resolve generation rate.
Yes, this is the "Gloom Sniper" trick. By shooting your death stain with any sidearm, you can safely recover your currency from a distance. This is highly recommended for boss fights where your Gloom might be stuck in the middle of a dangerous arena.
The Naylshotte is widely considered a top choice for beginners. It is available very early, has a low Resolve cost, and its "Fragile" debuff makes every boss fight significantly easier by boosting your melee damage output.
While it ranks lower on general tier lists, the Cursed Child is a powerful tool for specialized "Necromancer" builds. If you enjoy having summons fight for you and can manage the high Resolve cost, it offers a unique and effective playstyle that other sidearms cannot match.
Most veteran players recommend stopping at Level 9. The resource cost to reach Level 10 is very high, and the damage increase is often negligible compared to the utility gained by spending those resources on a second sidearm or Shell upgrades.
Key Takeaways for Mastering Sidearms
- Use the Gloom Sniper trick to protect your currency by shooting your death stain from a safe distance.
- Smelt old weapons at the anvil to retrieve 100% of your gold and materials when you want to try a new build.
- Match your sidearm to your Shell ; for example, pair Proxima with the Caged Hystrix for near-infinite fire.
- Prioritize the Naylshotte for bosses to stack the Fragile debuff and maximize your melee damage.
- Don't ignore the Cursed Child if you want a unique summoner playstyle, but be prepared for high Resolve costs.
- Stop at Level 9 upgrades for most weapons to maintain resource efficiency unless you have a surplus of gold.
- Combine infusions like Lightning or Blood with Soul Near Shards to create persistent AOE damage pools.
Start your journey by mastering the Naylshotte's timing, then experiment with the Caged Hystrix once you reach the mid-game to handle larger groups of enemies.