Home
Home
How Mitigation Chance and Strength Work in Cyberpunk 2077
In Cyberpunk 2077 2.0 and the Phantom Liberty expansion, Mitigation replaced the old Evasion stat as the primary defensive layer alongside Armor. It is a two-part mechanic: Mitigation Chance determines the probability of reducing incoming damage, while Mitigation Strength determines the percentage of damage blocked. By default, V has a 0% Chance and 50% Strength.
The transition from the 1.6 version of Night City to the 2.0 overhaul fundamentally changed how players survive high-intensity firefights. Gone are the days of stacking "Evasion" to simply ignore bullets. Instead, CD Projekt Red introduced a more nuanced system that rewards active movement and strategic cyberware integration. Understanding how to scale these stats is essential for anyone attempting a "Tank" build or playing on Very Hard difficulty.
Understanding the Difference Between Mitigation Chance and Strength
To master your survivability, you must view Mitigation as a "secondary roll" that occurs after your Armor has already processed a hit. While Armor provides a flat reduction based on the damage type and value, Mitigation acts as a percentage-based shield that can drastically increase your Effective Health Pool (EHP).
How the Two-Check Damage System Operates
When an enemy lands a hit on V, the game engine performs a sequential calculation. First, the raw damage is reduced by your Armor value. Following this, the game rolls a virtual die based on your Mitigation Chance . If the roll succeeds, the remaining damage is slashed by your Mitigation Strength . According to technical breakdowns from zKarmaa , this makes Mitigation particularly potent against high-damage single hits, such as sniper rounds or explosions, which might otherwise bypass the flat reduction provided by Armor.
Why Mitigation Strength Is Capped Differently Than Chance
While it is possible to reach a 100% Mitigation Chance through specific perks like "Can't Touch This," Mitigation Strength is much harder to scale. Most players will find themselves hovering around the 50% to 65% range. This is a deliberate design choice to prevent players from becoming entirely invulnerable. Even with a guaranteed proc, you will still take a portion of the damage, necessitating a baseline of Armor and Health to survive sustained fire.
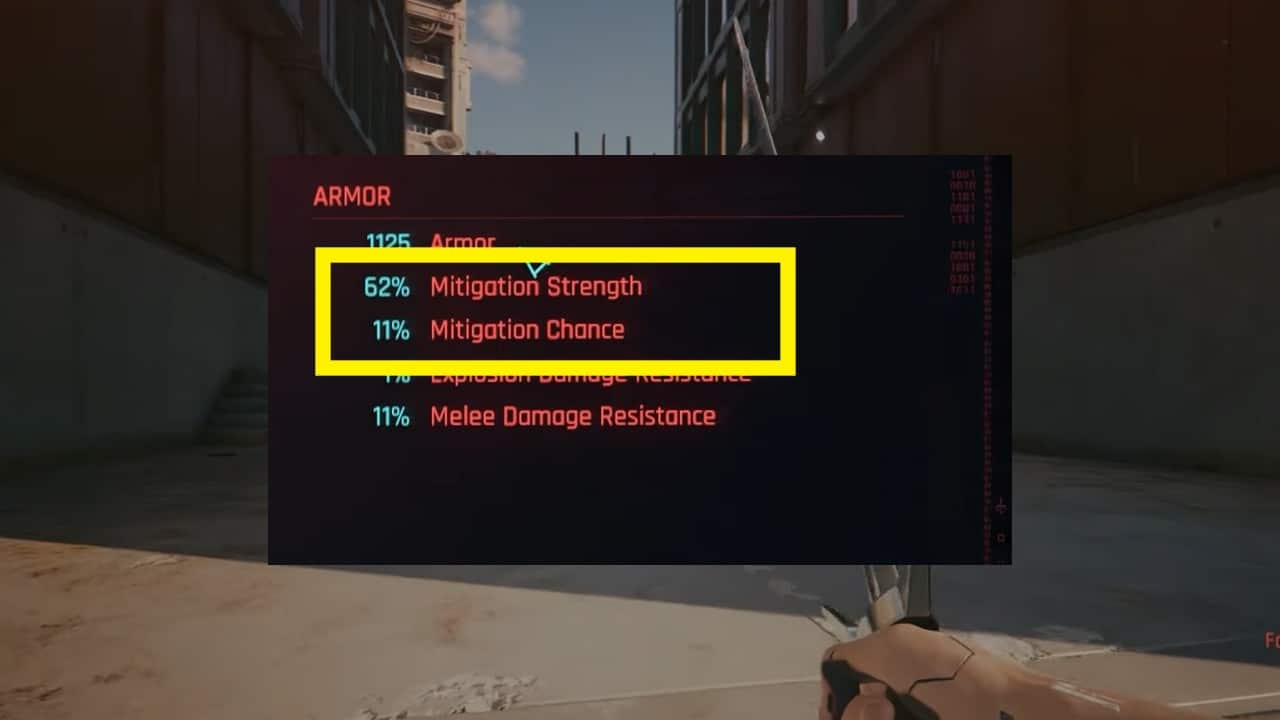
Image source: SegmentNext
Why Your Mitigation Bonuses Might Not Be Activating
One of the most frustrating experiences for players is building for high mitigation only to find their stats remain at 0% in the character menu. This is often not a failure of the build, but rather a result of how the game calculates "active" states versus "passive" stats.
Community testing on the Steam Community forums has identified a persistent bug regarding crouch-based mitigation. If your gameplay settings are set to "Hold to Crouch" rather than "Toggle Crouch," many perks that grant mitigation while crouching or staying still fail to trigger correctly. To ensure your defensive bonuses are active, it is highly recommended to switch to Toggle Crouch.
How to Verify Your Stats in the Character Menu
Because many mitigation bonuses are conditional (e.g., "while dashing" or "while behind cover"), they do not show up as permanent stats. To see your true potential, you must open your inventory and check the "Stats" sidebar while the action is occurring. For example, if you have the "Blind Spot" perk, you will only see the increased Mitigation Chance while you are actively crouching. If the numbers don't move while you are in the correct stance, you may be experiencing the aforementioned crouch bug or a conflict with your current Cyberware attunement.
How to Calculate Your Total Mitigation Chance and Strength
Calculating your total defense requires looking at three distinct sources: Cyberware, Perks, and hidden scaling. Unlike Armor, which is a straightforward additive sum, Mitigation often relies on "windows" of opportunity.
The Math Behind the Can't Touch This Perk
The "Can't Touch This" perk in the Reflexes tree is widely regarded as a cornerstone for mobility builds. The description states it grants "+100% Mitigation Chance" while dashing. There has been significant debate in the CDPR Forums regarding whether this is additive or multiplicative. Current testing suggests that during the specific animation frames of a Dash, your Mitigation Chance is set to a flat 100%, effectively guaranteeing that any hit taken mid-dash will be mitigated by your current Strength value.
Hidden Scaling and the Armor to Mitigation Theory
A popular theory among the technical community suggests that V gains a hidden 1% Mitigation Chance for every 100 points of Armor. While this has not been officially confirmed by CD Projekt Red, many players report seeing their base Mitigation Chance rise slightly as they equip higher-tier sub-dermal armor. Regardless of whether this hidden scaling exists, the synergy between the two stats is undeniable: Armor handles the "chaff" damage from light weapons, while Mitigation handles the "burst" damage from heavy hitters.
Top Perks for Increasing Your Mitigation Stats
If you want to build a character that ranks among the top survivors in Night City, you must invest in the Reflexes and Cool trees. These trees provide the most consistent ways to trigger mitigation without relying solely on expensive Cyberware.
- Can't Touch This (Reflexes)
- Grants 100% Mitigation Chance during Dashing. This is the most reliable way to avoid massive damage while closing the gap on enemies.
- Aerodynamic (Reflexes)
- Increases Mitigation Strength while mid-air. This is a top-tier choice for players who utilize the reinforced tendons for double-jumping.
- Blind Spot (Cool)
- Increases Mitigation Chance based on your proximity to enemies while crouching. This is essential for stealth-hybrid builds.
- Unnerving Precision (Cool)
- Provides a temporary boost to Mitigation Strength after performing a headshot or hitting a weak point.
"Mitigation isn't just a stat; it's a rhythm. You dash to trigger the chance, you crouch to sustain the strength, and you use Cyberware to bridge the gaps in between." — Community Build Guide
Essential Cyberware for a High Mitigation Build
While perks provide the triggers, Cyberware provides the baseline. To reach the upper echelons of survivability, you need to prioritize specific Integumentary System and Nervous System implants. The following table compares the most effective options available as of the 2.02 patch.
| Cyberware Name | Primary Bonus | Tier 5++ Potential | Best For |
|---|---|---|---|
| Neofiber | Chance & Strength | +10% Chance / +15% Strength | All-around defense |
| Spring Joints | Mitigation Strength | +20% Strength | High Armor builds |
| Countershell | Emergency Chance | +40% Chance at low HP | Berserk/Brawler builds |
| Defenzikov | Chance after Dash | +90% Chance for 3s | Sandevistan users |
Neofiber stands out as a top choice because it is one of the few items that increases both components of the mechanic. When upgraded to Tier 5++, its attunement bonuses (often scaling with Reflexes) can push your passive Mitigation Chance into the 20-30% range, making you significantly tankier even when you aren't actively dashing.
Mitigation vs Armor for Late Game Survivability
A common question among returning players is whether they should focus entirely on Armor or split their focus with Mitigation. In the current meta, Armor has clear diminishing returns. Once you surpass approximately 1000 to 1100 Armor, the actual damage reduction percentage begins to plateau. According to analysis on GameFAQs , this is the point where Mitigation becomes the more efficient investment.
Consider this scenario: If you have 1200 Armor, an extra 100 Armor might only reduce incoming damage by another 1-2%. However, increasing your Mitigation Strength from 50% to 60% via Spring Joints effectively reduces the damage of every mitigated hit by an additional 10%. For late-game bosses like Adam Smasher or the heavy hitters in the Phantom Liberty districts, this 10% difference is often what prevents a one-shot kill.
How to Reach 100% Mitigation Chance During Combat
Achieving permanent 100% Mitigation Chance is not possible, but achieving 100% uptime during combat is a viable high-level strategy. This "Evasion Tank" meta relies on a specific rotation of abilities and movement.
- The Dash-Spam Rotation: By alternating between standard Dashes and Air Dashes, you can keep the "Can't Touch This" bonus active for nearly the entire duration of a movement cycle.
- Kerenzikov Synergies: Using the Defenzikov implant alongside a Kerenzikov allows you to trigger a massive Mitigation Chance bonus every time you aim while sliding or dashing.
- Crouch-Sprinting: With the right perks in the Shinobi (Reflexes) tree, you can maintain high movement speeds while technically remaining in a crouched state, keeping "Blind Spot" bonuses active.
- Optical Camo Integration: Certain technical perks allow Optical Camo to grant Mitigation bonuses, providing a "panic button" that makes you nearly impossible to kill while invisible.
Frequently Asked Questions About Cyberpunk Mitigation
What is the maximum Mitigation Chance in Cyberpunk 2077?
Does Mitigation work against melee attacks and explosions?
Why is my Mitigation Chance 0% in the stats menu?
Is Neofiber better than traditional Armor cyberware?
Does Mitigation Strength affect how much damage I take while blocking?
Key Takeaways: Mastering Mitigation
Mitigation is the most effective way to scale your survivability in the late game of Cyberpunk 2077 . By balancing your Chance and Strength, you can survive encounters that would otherwise be impossible.
- Understand the Roll: Chance is how often it happens; Strength is how much it helps. Aim for at least 60% Strength.
- Fix the Bug: Always use Toggle Crouch in your gameplay settings to ensure your perks actually work.
- Prioritize Neofiber: This is your most important piece of defensive Cyberware for scaling both mitigation stats simultaneously.
- Use the Dash Window: Treat Dashing as a defensive cooldown, not just movement, to utilize the 100% chance window.
- Balance with Armor: Once you hit 1000 Armor, stop stacking it and move all your resources into Mitigation and Health.
- Check Active Stats: Remember that many bonuses only show up in the menu while you are actively performing the required action (crouching, dashing, etc.).
To start optimizing your build today, head to a Ripperdoc and swap out your basic sub-dermal armor for a high-tier Neofiber and Spring Joints combo.