Home
How to Maximize Your Stats in the Final Fantasy 13-2 Crystarium
To achieve a highly optimized build in Final Fantasy XIII-2, you must prioritize Large Nodes for specific roles. Noel should use Large Nodes for Commando (COM) to reach 1,000+ Strength, while Serah should use them for Ravager (RAV) to exceed 1,000 Magic. Always select ATB +1 as your first expansion bonus. Because Crystarium growth is permanent, saving your CP and completing entire stages at once is widely considered one of the best ways to avoid irreversible mistakes.
Why Planning Your Crystarium Growth Is Essential for Success
In Final Fantasy XIII-2, the Crystarium system functions as the primary vehicle for character progression. Unlike its predecessor, this system introduces a layer of permanence that demands careful foresight. Once a node is activated, the stat gain is locked; there is no "respec" or reset mechanic available. This makes the Crystarium one of the most critical systems to master if you aim for peak performance in the late-game content.
The primary goal for most players is to reach the 1,000-stat benchmark. For Noel, this means maximizing physical damage (Strength), while for Serah, it involves pushing magical output (Magic) to its limits. According to stat maxing research , failing to optimize Large Nodes can result in a character being significantly weaker than a planned build, potentially missing out on hundreds of stat points by the time you reach Stage 22.
Beyond raw numbers, the Crystarium determines your utility. Expansion bonuses allow you to unlock new roles, increase accessory capacity, and gain additional ATB segments. A haphazard approach might leave you with high HP but insufficient damage to clear the game's toughest optional bosses, such as the Yomi or Raspatil encounters. Therefore, understanding the distinction between node types is the first step toward a top-tier party.
Understanding the Core Mechanics of the 22-Stage Crystarium
The Crystarium is structured as a series of 22 stages. Each stage is a circular path of nodes that must be fully completed before you can move to the next. Upon finishing a stage, you are granted an "Expansion Bonus," which provides powerful upgrades that are not available through standard node activation.
Differentiating Between Small and Large Nodes
Visually, the Crystarium consists of two types of nodes. Small nodes are the most common and provide standard role level-ups and base stat increases. These base increases are fixed; it does not matter which role you are currently using when you activate a small node. However, Large Nodes are the key to optimization. When you activate a Large Node, you receive a bonus stat based on the role currently selected.
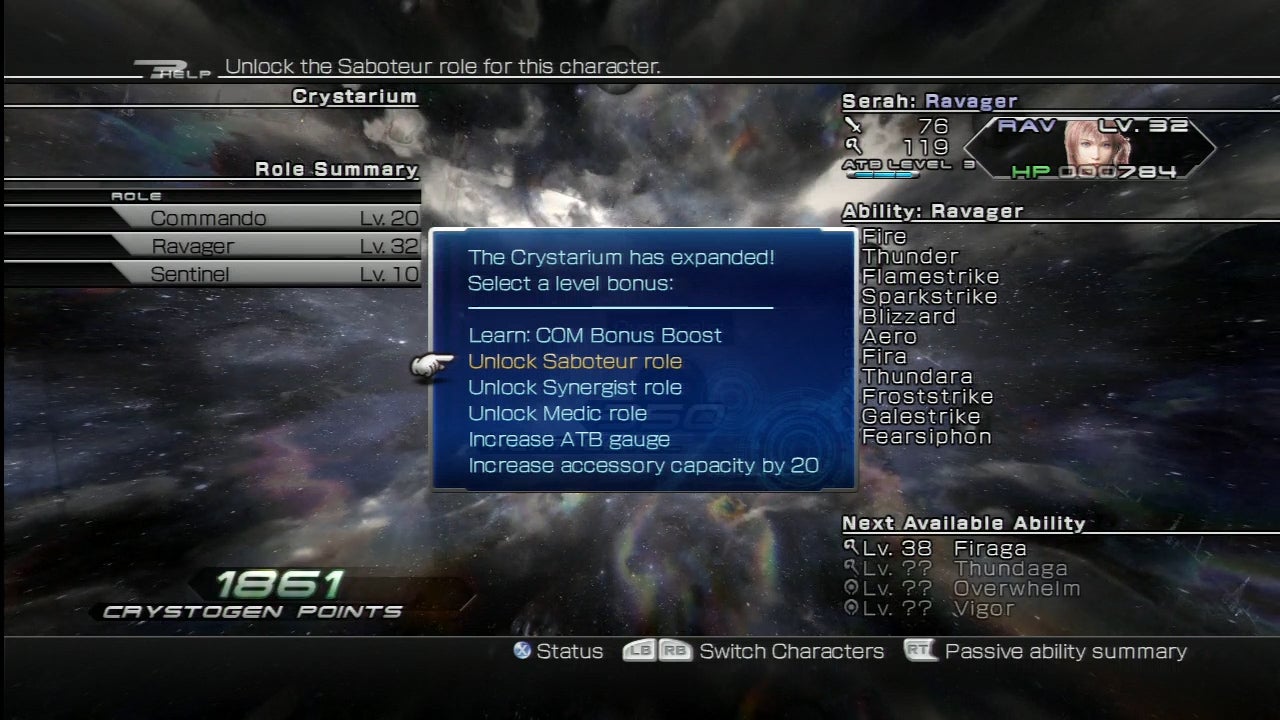
Image source: IGN
How CP Scaling Affects Your Progression
Crystarium Points (CP) are earned through combat and quest completion. As you progress through the 22 stages, the cost of activating nodes increases exponentially. In Stage 1, a node might cost as little as 10 CP, with the entire stage requiring roughly 2,580 CP. By the time you reach Stage 22, individual nodes can cost thousands of CP, with the final stage requiring over 100,000 CP to complete. According to IGN's growth data , the total CP required to max all roles to level 99 is substantial, making efficient farming in areas like Academia 400 AF or the Archylte Steppe a necessity for completionists.
The Essential Rules for Large Node Stat Bonuses
To build a top-performing character, you must align your Large Node activations with the specific stat bonuses provided by each role. The following table outlines the permanent bonuses granted when a Large Node is activated under a specific role:
| Role Active on Large Node | Stat Bonus Granted | Primary Character Focus |
|---|---|---|
| Commando (COM) | +2 Strength | Noel (Priority) |
| Ravager (RAV) | +2 Magic | Serah (Priority) |
| Sentinel (SEN) | +6 HP | Defensive Builds |
| Medic (MED) | +6 HP | Defensive Builds |
| Saboteur (SAB) | +2 Strength (Even) / +2 Magic (Odd) | Hybrid Optimization |
| Synergist (SYN) | +2 Magic (Odd) / +6 HP (Even) | Hybrid Optimization |
These bonuses are additive to the natural growth the character receives. For example, if Noel levels up as a Commando on a Large Node, he receives his base Strength increase plus an additional +2 Strength. Over hundreds of nodes, this discipline results in a character that stands out as a top choice for high-level play.
Mastering the Saboteur and Synergist Odd-Even Logic
The Saboteur (SAB) and Synergist (SYN) roles are unique because their Large Node bonuses alternate based on the level reached. This is a common point of confusion for many players, but mastering it is essential for a highly optimized build. The bonus is determined by the resulting level , not the level you are starting from.
This logic allows you to use SAB and SYN to "fill the gaps." If Noel has already maxed his Commando role but still has Large Nodes available in a stage, he can level up Saboteur to an Even level to continue gaining Strength. Conversely, Serah can use both Saboteur and Synergist Odd levels to continue boosting her Magic stat when Ravager levels are unavailable.
How to Develop a High-Strength Noel Build
Noel Kreiss is naturally predisposed toward physical combat. His animations are faster for melee strikes, and his unique abilities, such as Meteor Javelin, scale heavily with the Strength stat. To build a top-tier Noel, your priority should always be physical power.
On every Large Node, your priority list should be as follows:
- Commando (COM): Use this until the role reaches level 99.
- Saboteur (SAB) - Even Levels: Use this if COM is unavailable or maxed.
- Sentinel (SEN) or Medic (MED): Only use these if Strength-boosting options are completely exhausted for that stage.
Many expert players utilize a "Leftover Node" strategy. Noel actually has more Large Nodes available across the 22 stages than he has levels in COM and Even-SAB combined. When you run out of Strength options, the community-accepted "best" approach is to put remaining Large Nodes into HP (via SEN/MED) to improve survivability, or into Magic if you prefer a more hybrid Noel for Ravager duties. However, for most, the extra HP is a popular choice for tackling the game's DLC super-bosses.
How to Develop a High-Magic Serah Build
Serah Farron excels as a magical powerhouse. Her role as a Ravager is among the strongest in the game for building the stagger gauge, and her Saboteur spells are vital for debuffing enemies. To maximize her potential, every Large Node must be dedicated to Magic.
Serah's Large Node priority list:
- Ravager (RAV): The primary source of Magic bonuses.
- Saboteur (SAB) - Odd Levels: A secondary source of Magic.
- Synergist (SYN) - Odd Levels: A tertiary source of Magic.
Correcting the Known Errors in Official Strategy Guides
By strictly adhering to Magic-boosting roles on Large Nodes, Serah can easily surpass 1,000 Magic. This makes her exceptionally strong when using spells like Saga or when utilizing her Feral Link abilities. It is widely regarded as one of the most effective ways to play Serah, as her physical Strength is naturally low and not worth the investment.
Selecting the Most Effective Expansion Bonuses
Every time you complete a full circuit of the Crystarium, you are offered a choice of expansion bonuses. These choices are just as permanent as the nodes themselves. While the "best" choice can vary slightly based on playstyle, a general consensus exists among high-level players.
- ATB +1: This should be your absolute first priority for both characters. Having more ATB segments allows for longer chains and faster ability execution.
- Role Bonuses (COM Bonus, RAV Bonus, etc.): These increase the effectiveness of the role (e.g., COM Bonus increases damage dealt). These are highly recommended after ATB segments are maxed.
- Accessory Capacity: Essential for the late-game. Top-tier accessories like the Kaiser Knuckles or Magistral Crest require significant capacity.
- Unlocking New Roles: You will eventually need to unlock all roles (SAB, SYN, MED) to progress, but these can often wait until after the first ATB +1 is secured.
Implementing the Stage-Saving Method for Error-Free Leveling
Because the Crystarium is permanent, "autopilot" leveling is the most common way players ruin their builds. To prevent this, many veterans use the Stage-Saving Method . Instead of spending CP as soon as you earn it, you accumulate enough CP to complete an entire stage (or multiple stages) in one sitting.
"Saving your CP allows you to map out the entire stage's Large Nodes before you click a single one. It removes the guesswork and ensures you don't accidentally use a Commando level on a Small Node when a Large Node was just one step away." — Community Wisdom from GameFAQs
For players on PC or Steam Deck, this strategy is even more effective. The faster load times allow for quick "save-scumming." You can save your game, spend your CP, and if you realize you made a mistake or missed a Large Node bonus, you can reload and try again within seconds. This safety net is a significant advancement for players who want a perfect build without the stress of permanent errors.
Managing Monster Development Alongside Human Characters
While Noel and Serah use CP, your third party member—a monster—uses specialized materials like Droplets, Slivers, and Orbs. Monster leveling is a separate but complementary system. A top-tier team usually includes a monster that fills the gaps in Noel and Serah's capabilities.
For example, if you are building a "Glass Cannon" Serah with max Magic and low HP, you should prioritize a Sentinel monster (like a Silver Chocobo or Bunkerbeast) to soak up damage. Monsters also have "Late-Peaker" archetypes; some monsters may seem weak for the first 50 levels but gain massive stat boosts in their final 10 levels. Researching your specific monster's growth curve is just as important as managing the human Crystarium.
Why High HP Is Often Devalued in High-Level Strategies
It may seem counterintuitive, but many high-level players and speedrunners consider pure HP builds to be suboptimal. This is due to several core game mechanics that favor offensive stats over defensive ones.
First, the Poison mechanic in Final Fantasy XIII-2 deals damage based on a percentage of the character's maximum HP. A character with 10,000 HP will take significantly more damage from Poison than one with 5,000 HP. Second, most healing spells (like Cure) provide a flat amount of health or a small percentage that often struggles to keep up with massive health pools. Finally, the "Glass Cannon" meta is prevalent because the best defense in this game is a fast offense—staggering and killing an enemy quickly prevents them from using their most dangerous attacks in the first place.
Avoiding Common Pitfalls During the Leveling Process
Even with a guide, mistakes happen. Here are the most common pitfalls to watch out for:
- Wasting Large Nodes on Small Bonuses: Always scan the path ahead. If a Large Node is coming up, ensure you have a level in COM (for Noel) or RAV (for Serah) ready to go.
- Mixing up SAB/SYN Odd-Even: Remember, it is the resulting level that matters. If you are level 18 and go to 19, that is an Odd level (Magic for both SAB and SYN).
- Ignoring Accessory Capacity: If you reach the end-game with base accessory capacity, you won't be able to equip the items necessary to break the 1,000-stat barrier.
Key Takeaways for a Highly Optimized Build
Optimizing the Crystarium is a marathon, not a sprint. By following these rules, you ensure your characters reach their full potential.
- Prioritize Large Nodes: Use COM for Noel's Strength and RAV for Serah's Magic to maximize damage output.
- Master the SAB/SYN Math: Remember that Even levels give Strength (SAB) or HP (SYN), while Odd levels give Magic for both.
- ATB +1 First: Always choose the extra ATB segment as your first expansion bonus to increase combat efficiency.
- Hoard Your CP: Use the Stage-Saving method to complete entire circuits at once, reducing the risk of permanent mistakes.
- Correct Guide Errors: Be wary of the Stage 3 Serah discrepancy in older physical guides; trust the in-game node counts.
- Offense Over Defense: Don't over-invest in HP, as Poison damage scales with your max health and speed is the top priority.
Start by saving your next 5,000 CP and mapping out your current stage to ensure every Large Node is used for a priority stat.
Frequently Asked Questions
Can I reset my Crystarium if I make a mistake?
No, there is no way to reset or "un-learn" nodes in Final Fantasy XIII-2. Every choice you make is permanent. If you make a significant error, your only options are to continue with the current stats or reload an earlier save file. This is why maintaining multiple save slots is highly recommended.
Does it matter which role I level on small nodes?
No, small nodes provide the same base stat increases regardless of which role is active. You can use small nodes to level up roles that you don't want stat bonuses for (like Sentinel or Medic) so that you can save your "good" roles (Commando or Ravager) for the Large Nodes.
What is the maximum level for each role?
Every role (Commando, Ravager, Sentinel, Saboteur, Synergist, and Medic) can reach a maximum level of 99. There are exactly enough nodes in the 22 stages of the Crystarium to reach level 99 in all six roles for both Noel and Serah.
How much total CP do I need to max out both characters?
To fully max out both Noel and Serah, you will need approximately 2.5 to 3 million CP total. While this sounds daunting, late-game enemies and specific CP-farming spots (like the Indomitus in Academia 400 AF) can provide tens of thousands of CP per hour.
Should I focus on Noel or Serah first?
It is generally best to level them equally. However, if you are struggling with boss fights, prioritizing Noel's Strength can help you end battles faster, while prioritizing Serah's Ravager levels can help you stagger enemies more quickly. A balanced approach is usually the most effective for general gameplay.