Home
Home
How to Download and Install Mods for Cyberpunk 2077 Without Crashing Your Game
To successfully mod Cyberpunk 2077 in 2026, follow these three steps: 1. Preparation: Disable auto-updates on Steam/GOG and back up your save files. 2. Core Setup: Install the "Core 6" dependencies (Cyber Engine Tweaks, Redscript, RED4ext, ArchiveXL, TweakXL, and Codeware) manually. 3. Installation: Use Vortex for automated management or Manual Drag-and-Drop for precise control. Always check the "Posts" tab on Nexus Mods for the latest version compatibility.
Why Modding Cyberpunk 2077 in 2026 Requires a Specific Strategy
As of late 2026, Cyberpunk 2077 has reached a state of relative maturity following the massive shifts of the Phantom Liberty expansion and subsequent 2.12+ patches. However, the modding landscape remains volatile. Unlike simpler games, Cyberpunk relies on a complex web of engine extenders that must be updated every time CD Projekt Red releases even a minor stability patch. According to community documentation on the Redmodding Wiki , version dependency is the primary cause of game crashes.
The "dependency hell" often cited by new players—where a single clothing mod requires twenty other files to function—is a byproduct of how the REDengine 4 handles custom assets. In 2026, modders have moved away from replacing existing game files and instead use "XL" frameworks to inject new content. This makes the game more stable in the long run but requires a precise setup phase that cannot be skipped. If you attempt to drag and drop a mod without these frameworks, the game will likely "Flatline" on startup.
What You Must Do Before Downloading Your First Mod
Before you even visit Nexus Mods, your local game environment must be prepared. Clean files are the foundation of a stable modded experience. If you have leftover files from a previous installation, they may conflict with modern 2026 tools.
How to Disable Auto-Updates on Steam and GOG
On Steam, right-click Cyberpunk 2077 in your library, select Properties > Updates , and change the dropdown to "Only update this game when I launch it." On GOG Galaxy, click the settings icon next to the Play button, go to Manage Installation > Configure , and disable "Auto-updates." This ensures that when a new patch drops, you have time to wait for the core framework creators to update their tools before you commit to the new version.
How to Back Up Your Save Files and Vanilla Executables
Modding carries an inherent risk of save corruption, especially when removing script-heavy mods mid-playthrough. Navigate to
%userprofile%\Saved Games\CD Projekt Red\Cyberpunk 2077\
and copy the entire folder to a secure location. Additionally, back up your
bin/x64/Cyberpunk2077.exe
file. If a mod installation goes wrong, having the original executable can sometimes save you from a full 100GB re-download.
Creating Your Nexus Mods Account and Setting Preferences
Nexus Mods is the primary hub for the community. While a free account is sufficient, be aware that non-premium users face a 5-second download delay and capped speeds. When browsing, always look for the "Requirements" pop-up. As noted in CDPR community discussions , ignoring these requirements is the most common reason for installation failure. Set your preferences to show "Adult Content" if you plan on using high-fidelity body or skin mods, as many are flagged behind this filter.
The 6 Core Dependencies You Need to Install First
Think of these six mods as the operating system for your other mods. Without them, the game doesn't know how to read custom scripts or where to place new 3D models. These should always be installed manually to ensure they are placed in the correct root directories.
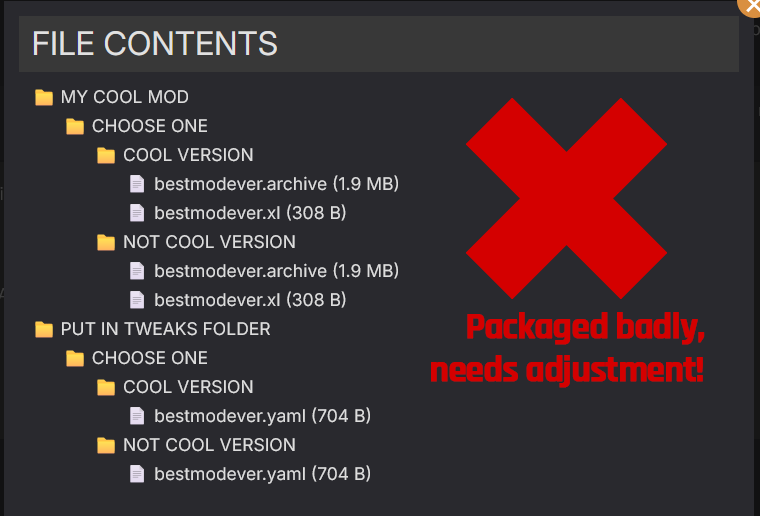
Image source: REDModding Wiki
Setting Up Cyber Engine Tweaks (CET) for Scripting Support
Cyber Engine Tweaks is the most vital component. It provides a console for commands and a fix for various engine bugs. To install it, download the release and drag the
bin
folder into your main Cyberpunk 2077 directory. The final path should look like:
Cyberpunk 2077/bin/x64/plugins/cyber_engine_tweaks.asi
. Upon the first launch, you will be asked to bind a key to open the CET overlay.
Installing Redscript and RED4ext for Gameplay Logic
Redscript allows mods to replace or add to the game's native scripts (written in Swift-like syntax), while RED4ext is a library that allows modders to expand the engine itself. Both are required for almost every gameplay-altering mod. Redscript files typically go into
r6/scripts/
, while RED4ext lives in
red4ext/
. These tools are exceptionally strong and form the backbone of the 2026 modding scene.
Why You Need ArchiveXL and TweakXL for Custom Items
In the early days, adding a new shirt meant replacing an existing one. ArchiveXL and TweakXL changed this by allowing "DLC-style" injection. You can now add thousands of items without losing vanilla content. These frameworks are widely considered among the top requirements for any visual customization.
| Dependency | Primary Function | Installation Path |
|---|---|---|
| Cyber Engine Tweaks | Scripting & Console |
bin/x64/plugins/
|
| Redscript | Compiler for scripts |
r6/scripts/
|
| RED4ext | Engine Extender |
red4ext/
|
| ArchiveXL | Resource Loading |
archive/pc/mod/
|
| TweakXL | Database Modification |
r6/tweaks/
|
| Codeware | UI & Library Support |
bin/x64/plugins/
|
How to Download and Install Mods Using Vortex
Vortex is the official mod manager from Nexus Mods and is a popular choice for those who prefer a graphical interface. While some veteran modders prefer manual installation for transparency, the Cyberpunk 2077 integration in Vortex has improved significantly by 2026.
Connecting Vortex to Your Cyberpunk 2077 Directory
After installing Vortex, navigate to the "Games" tab and search for Cyberpunk 2077. Click "Manage." Vortex will attempt to find your game folder automatically. If it fails, point it to the root folder (where
Cyberpunk2077.exe
is located). Ensure your "Mod Staging Folder" is on the same drive as the game to enable
Hardlink Deployment
. This is a top-tier method for performance, as it doesn't actually move files but creates a reference that the OS treats as a physical file.
Managing Your Load Order to Prevent Conflicts
Load order determines which mod "wins" if two mods try to change the same thing. In Vortex, you can use the "Manage Rules" feature. A common rule of thumb is to ensure your Core Dependencies (like CET) are set to load before any individual mods. If you see a lightning bolt icon in Vortex, it indicates a conflict. Click it to decide which mod should load after the other.
What to Do When Vortex Fails to Deploy Files
If you see an "Elevation Required" error, it means Vortex doesn't have the permissions to create hardlinks. Running Vortex as an Administrator usually fixes this. If mods still aren't appearing in-game, check the "Plugins" tab in Vortex to ensure they are enabled. Remember that Vortex cannot manage REDmod-specific mods unless the REDmod DLC is installed and the "Enable Mods" toggle is active in the REDlauncher.
How to Manually Install Mods for Total Control
Manual installation is often recommended for users who want to understand the file structure and avoid the overhead of a manager. It is the most reliable way to ensure that core frameworks are placed correctly.
Where to Place Files in the Archive and Plugins Folders
Most mods come in a
.zip
or
.7z
file. When you open it, you will usually see a folder structure that mirrors the game's directory.
-
.archive files:
These go into
Cyberpunk 2077/archive/pc/mod/. If themodfolder doesn't exist, create it. -
.lua files (CET mods):
These go into
bin/x64/plugins/cyber_engine_tweaks/mods/. -
.reds files:
These go into
r6/scripts/.
readme.txt
inside the download for specific instructions, as some complex mods might have unique requirements.
How to Use the Official REDmod DLC for Integrated Support
REDmod is CD Projekt Red's official toolset. It is a free DLC on Steam and GOG. Mods designed for REDmod are placed in the
Cyberpunk 2077/mods/
folder (not the archive folder). These mods must contain a
info.json
manifest file. As noted in
official modding support documentation
, REDmod allows for better integration of animations and sounds, but it is not a replacement for the community-made frameworks like CET.
Enabling the Modded Toggle in the REDlauncher
Even if you install everything correctly, mods will not load unless you enable them in the launcher. When you click "Play" on Steam or GOG, the REDlauncher appears. Look for the small "Gear" icon next to the Play button. Click it and ensure "Enable Mods" is toggled on. If this toggle is greyed out, it means you haven't installed the REDmod DLC or you don't have any mods in the
/mods
folder.
Which Modding Method Is Right for You?
Choosing between Vortex and Manual installation depends on your technical comfort level and the size of your mod list. Many users find that a hybrid approach—manually installing core frameworks and using Vortex for everything else—ranks among the top strategies for stability.
| Method | Ease of Use | Troubleshooting | Best For |
|---|---|---|---|
| Vortex | High (One-click) | Moderate (Automated) | Beginners & Large Collections |
| Manual | Low (Drag & Drop) | High (Transparent) | Advanced Users & Core Frameworks |
| REDmod | Moderate | Low (Official) | Animation & Sound Mods |
How to Install Cyberpunk 2077 Mods on Steam Deck and Linux
Modding on the Steam Deck is entirely possible but requires extra steps due to the Proton compatibility layer. Since Proton creates a "fake" Windows environment (a prefix), the game doesn't naturally know how to load custom
.dll
files like those used by Cyber Engine Tweaks.
The Specific Launch Options Required for Proton
To make CET work on SteamOS, you must tell Proton to override certain system libraries. In Steam, right-click the game, go to
Properties > General
, and find the
Launch Options
box. Paste the following command:
WINEDLLOVERRIDES="version,winmm=n,b" %command%
This command forces the game to use the modded versions of these libraries rather than the standard Windows ones.
Navigating the Linux File System to Find Your Game Folder
On the Steam Deck, your game files are hidden deep in the
compdata
folder. The typical path is:
/home/deck/.local/share/Steam/steamapps/common/Cyberpunk 2077/
.
If you are using an SD card, it will be under
/run/media/mmcblk0p1/steamapps/common/Cyberpunk 2077/
. Use the "Dolphin" file manager in Desktop Mode to move your files. Be careful with capitalization, as Linux is case-sensitive, whereas Windows is not.
What to Do When Your Game Flatlines After Modding
The "Flatlined" error is the most common frustration for modders. It usually indicates a script conflict or an outdated dependency. In 2026, we have better tools to diagnose these issues than we did at launch.
Using RedConflictChecker to Identify Broken Files
If your game crashes on startup, download
RedConflictChecker
. This tool scans your
archive
and
r6
folders to see if two mods are trying to modify the same resource. It will generate a log file that tells you exactly which files are clashing. According to
advanced modding discussions on Reddit
, resolving these conflicts manually is often faster than a full reinstall.
The Batching Strategy for Stable Load Orders
Never install 50 mods at once. Use the "Rule of 5": install five mods, launch the game, and verify stability. If the game crashes, you know the culprit is one of the last five files you added. This incremental approach is a popular choice for maintaining a stable 200+ mod load order without losing your mind to troubleshooting.
The Clean Slate Protocol for a Fresh Start
If your game is completely broken and you can't find the cause, use the "Cyberclean" script available on Nexus. This script identifies any file that isn't part of the original vanilla installation and moves it to a backup folder. This allows you to reset the game to its factory state without re-downloading 100GB of data. It is a significant advancement in mod management efficiency.
Frequently Asked Questions
While rare, corruption can occur if you remove a mod that has deeply integrated scripts (like a level-cap increaser or a new quest mod) mid-playthrough. Visual mods like clothing or textures are generally safe to add and remove. To stay safe, always keep a backup of your
Saved Games
folder before testing new mods.
No, the base game supports modding perfectly fine. However, many modern mods created in 2025 and 2026 are built specifically for the assets found in Dogtown. If a mod requires Phantom Liberty, it will be listed in the "Requirements" section on Nexus Mods. If you don't have the DLC, the mod simply won't load or may cause a crash.
This is usually due to a conflicting overlay (like Discord or Steam) or an incorrect installation path. Ensure
cyber_engine_tweaks.asi
is in
bin/x64/plugins/
. If it still doesn't appear, try disabling other overlays or running the game in "Borderless Window" mode instead of "Exclusive Fullscreen."
It is not recommended. Vortex tracks files using its own database; if you manually move or delete files that Vortex is managing, it can lead to "deployment errors" and broken links. A better approach is to manually install the "Core 6" dependencies and use Vortex for everything else, ensuring you don't touch the Vortex-managed folders manually.
First, wait. Do not launch the game until Cyber Engine Tweaks, Redscript, and RED4ext have been updated on Nexus (usually takes 24-48 hours). Once the core tools are updated, download the new versions and overwrite the old files. Most minor mods (clothing, textures) will not need updates, but anything involving scripts will.
Key Takeaways for Modding Success
- Disable auto-updates on Steam or GOG immediately to prevent patches from breaking your frameworks.
- Install the Core 6 dependencies (CET, Redscript, RED4ext, ArchiveXL, TweakXL, Codeware) manually before adding any other mods.
- Choose one primary method —either Vortex or Manual—and stick to it to avoid file tracking conflicts.
- Use the "Rule of 5" by installing mods in small batches to easily isolate the cause of any crashes.
- Check the "Posts" tab on Nexus Mods for every mod you download to see if other users are reporting issues with the current game version.
- Apply the Proton launch command if you are playing on Steam Deck or Linux to enable DLL overrides.
-
Keep a vanilla backup
of your
binandr6folders for quick recovery without a full reinstall.
Start by installing Cyber Engine Tweaks and verifying the overlay works in-game before adding your first visual mod.