Home
How to Find and Solve the Dragon Stone Chamber Puzzle in Crimson Desert
To solve the Dragon Stone Chamber puzzle, you must align three rotating stone discs in the central pit. The standard solution requires matching icons to external murals: Sun/Moon at 12 o'clock , Scorpion at 10 o'clock , and the Large Spiral in the top-right quadrant . For a faster "cheat" method, align the left side of the shortest ledge on the rim of each disc to point exactly North (12 o'clock).
Where Is the Dragon Stone Chamber Located?
Finding the Dragon Stone Chamber is the first hurdle for many players exploring the Hernand region. This ancient site is not immediately visible on the surface, as it is tucked away within a massive geological formation. According to IGN's exploration data , the chamber is situated approximately 700 meters south-southeast of Hernand Town.
If you are navigating by landmarks, look for the Greymane Camp at Howling Hill . The chamber lies just southeast of this camp. On your world map, the location is often marked by a "Question Mark" or a "Mysterious Energy" icon near the area known as Thinker’s Meadow. As you approach the coordinates, you will encounter a massive chasm in the ground. This hole is the entrance to the trial, but you cannot simply jump to the bottom without a plan.
Navigating the Chasm Entrance
Once you reach the edge of the chasm, do not drop straight down. Instead, look toward the north/northwest wall of the pit. There is a specific ledge positioned about midway down the cliffside. You will need to glide or carefully climb down to this platform to find the mural entrance. This ledge is the only way to access the interior chamber where the "Sword of the Cursed" memory is triggered.
Hernand Town: Head 700m South-Southeast from the main gate.
Greymane Camp: Be prepared for high-level skirmishes near the Howling Hill ridge.
The Chasm: Look for a massive circular hole near Thinker’s Meadow.
How to Open the Sealed Mural Entrance
Reaching the ledge is only the beginning. The entrance to the Dragon Stone Chamber is sealed by a large stone mural depicting a painted tree. This door does not respond to standard interaction prompts or physical attacks. To bypass this seal, you must utilize specific tools acquired earlier in your journey.
Using the Lantern and Visione
First, you must equip and use a Lantern . The light from the lantern reveals shadowy outlines on the tree mural that are otherwise invisible to the naked eye. Once these outlines are visible, you must activate the Visione . This triggers the "Sword of the Cursed" memory, a narrative sequence that provides context for the trial ahead. Without the Visione active, the physical interaction prompt for the door will remain disabled.
The Physical Push Mechanic
A common point of confusion for players is the interaction with the central stone block. Unlike most doors in Crimson Desert that open with a single tap, this seal requires a sustained physical push. You must hold the interaction button and walk forward for approximately 3 to 5 seconds. The wall will slowly slide open, revealing the path to the central puzzle pit. If you let go too early, the animation will reset, and the door will remain closed.
How to Solve the Dragon Stone Chamber Puzzle Using Murals
Inside the chamber, you will find three large, rotating stone discs set into the floor. The objective is to align these discs so that their icons match the hidden murals scattered throughout the Hernand Highlands. While the game provides two maps on the chamber walls (East and West) marked with red "V" symbols, these clues can be difficult to interpret due to the low-resolution textures in the cave.
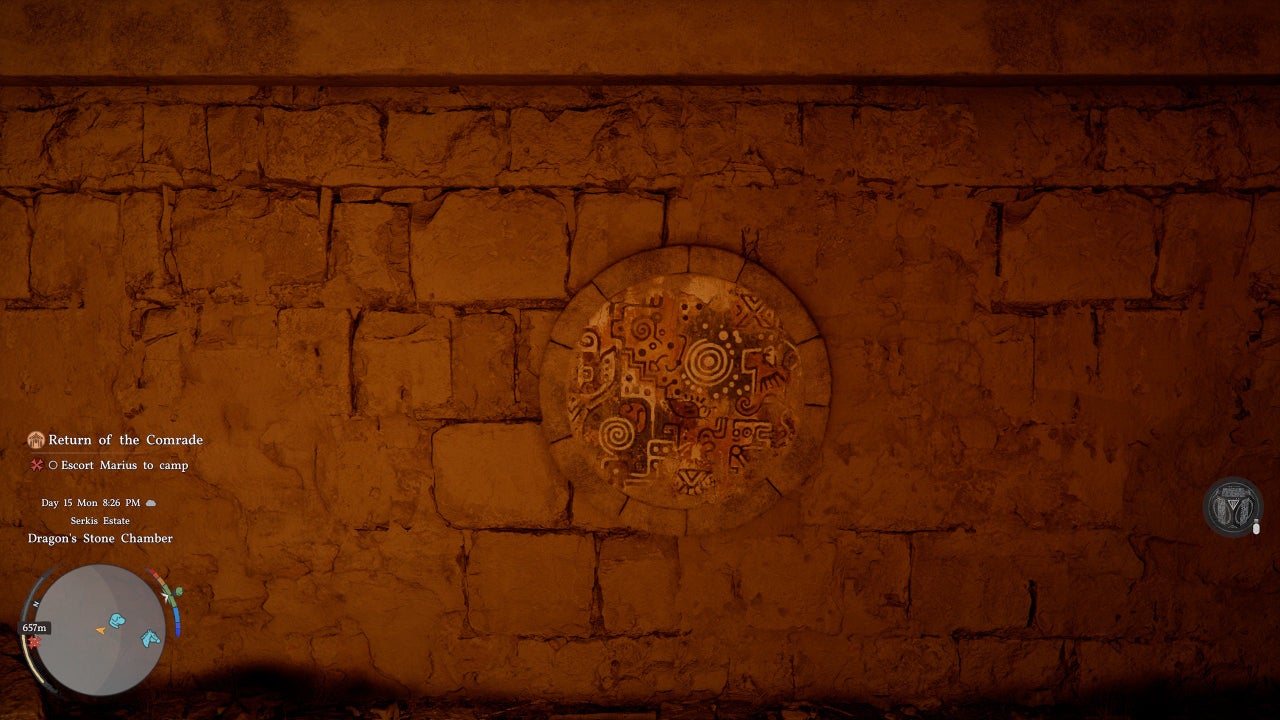
Image source: IGN
Finding the External Mural Clues
If you prefer to solve the puzzle the "intended" way, you must locate three specific murals in the open world. According to Polygon's research , these murals are located along the cliffsides of Anvil Hill and near the House of Healing.
| Mural Icon | Visual Description | Correct Alignment Position |
|---|---|---|
| Sun and Moon | Two circular celestial bodies | North / 12 o'clock |
| Scorpion / Horse Legs | Pincer-like appendages | Northwest / 10-11 o'clock |
| Black Spirals | Concentric circular patterns | Large spiral in top-right quadrant |
The Sun and Moon mural is located near a northern rivulet on the Anvil Hill cliffside. The Black Spirals are found just northeast of the Sun/Moon mural on the same cliff face. Finally, the Scorpion (sometimes referred to by the community as "Horse Legs" or "Pincers") is located roughly 400 meters southwest along the cliff from the spirals. Aligning the discs to these positions will trigger the completion sequence.
How to Use the Shortest Ledge Cheat to Solve It Instantly
For players who find the mural icons too blurry or difficult to align, there is a "geometry cheat" discovered by the community. This method relies on the physical model of the stone discs rather than the painted icons. Each disc has a rim composed of several ledges of varying lengths. This is widely considered one of the most reliable ways to bypass graphical issues.
The Geometry Secret
If you look closely at the outer rim of any of the three stone plates, you will notice that the ledges are not uniform. One ledge on each disc is significantly shorter than the others. The "cheat" is simple: align the left side of the shortest ledge so that it points exactly upward (12 o'clock) on all three plates. When all three discs have their shortest ledge oriented North, the puzzle will solve automatically.
Why This Method Is Recommended
This technique is a top choice for speedrunners and players on low-end hardware. Because it relies on the physical geometry of the 3D model rather than the texture applied to it, you don't need to worry about "Low" graphics settings making the icons illegible. It is a significant advancement over the trial-and-error method, as it provides a pixel-perfect reference point that is always visible.
Why Is the Dragon Stone Chamber Puzzle Not Working?
Despite following the steps, many players encounter technical hurdles that prevent the puzzle from completing. These range from interaction bugs to rendering issues that hide vital clues. Addressing these early can save hours of frustration.
The Interaction Prompt Bug
A frequent issue reported in community forums is the disappearance of the "Rotate" prompt. If you approach a disc and no button prompt appears, the interaction trigger has likely become stuck. The most effective fix is to save your game manually and perform a hard restart. This resets the chamber's state and usually restores the interaction triggers. Avoid simply reloading a checkpoint, as this may not fully clear the cached state of the puzzle room.
Graphics Settings and Invisible Clues
On "Low" or "Minimum" graphics settings, the wall maps inside the chamber often appear as blank, muddy textures. This makes it impossible to see the red "V" marks that point to the mural locations. If you are playing on an AMD card or a low-end PC, temporarily switching your graphics preset to "Cinematic" or "High" can reveal these clues. Alternatively, using the "Shortest Ledge" method mentioned above bypasses this requirement entirely, making it a popular choice for players with hardware limitations.
What Rewards Do You Get for Completing the Chamber?
Completing the Dragon Stone Chamber is highly recommended for any player looking to optimize their character's power. The rewards are not just cosmetic; they provide tangible benefits to exploration and combat progression.
The Abyss Artifact and Skill Points
The primary reward for solving the puzzle is an Abyss Artifact . Upon interaction, this artifact grants the player one permanent skill point. In the late-game economy of Crimson Desert , these points are exceptionally valuable, as they allow you to unlock high-tier combat abilities that are otherwise gated by experience grinding. This makes the chamber a top-tier destination for players reaching the mid-game transition.
Memories of Abundance
In addition to the skill point, you will receive a consumable item called Memories of Abundance . When used, this item reveals all hidden map markers, points of interest, and resource nodes in the Hernand region. This is a significant step forward for completionists who want to clear the map without relying on external guides for every minor collectible.
The "Sword of the Cursed" Myth
It is important to manage expectations regarding the quest's name. Although the memory and the quest are titled "Sword of the Cursed," you do not receive a physical weapon upon completion. This has led to some community frustration, but the artifact and map reveal are generally considered fair compensation for the puzzle's difficulty. There is, however, a hidden diamond node at the very bottom of the pit (outside the puzzle room) that can be mined for extra gold value.
Frequently Asked Questions
- Do I need a specific quest to enter the Dragon Stone Chamber?
- No, you do not need a pre-requisite quest to find the chamber. However, you must have the Visione tool equipped to trigger the entrance mural's memory. Without the Visione, the door will not respond to the "push" mechanic, effectively locking you out of the trial.
- Can I brute force the puzzle by rotating the discs randomly?
- While technically possible, brute forcing is not recommended due to the precision required. The discs must be aligned within a very narrow margin of error. Using the "Shortest Ledge" geometry trick is a much faster alternative to random guessing if you are struggling with the mural icons.
- Where exactly is the House of Healing mural located?
- The mural is located approximately 350 meters northwest of the House of Healing. It is painted onto the cliffside near a small cluster of trees. Look for the red "V" mark on your in-game map if you have the Visione active, as it will highlight the area.
- What happens if I rotate the discs in the wrong order?
- The order in which you rotate the discs does not matter. The puzzle only checks for the final alignment of all three discs simultaneously. You can start with the Sun/Moon disc or the Spirals disc; as long as all three are in their correct positions at the same time, the artifact will spawn.
- Why is my wall map blank inside the chamber?
- This is a known rendering bug associated with low texture settings. The game fails to load the high-detail overlay for the mural maps. To fix this, temporarily increase your texture quality to "High" or use an external guide to find the mural locations.
Key Takeaways for the Dragon Stone Chamber
Solving the Dragon Stone Chamber is a rite of passage for players in the Hernand Highlands. By following these steps, you can ensure a smooth completion of this Abyss trial:
- Locate the chasm south-southeast of Hernand Town, near Howling Hill.
- Use the Lantern and Visione to reveal the entrance and push the stone block for 3-5 seconds.
- Align the Sun/Moon disc to the 12 o'clock (North) position.
- Align the Scorpion disc to the 10 o'clock (Northwest) position.
- Position the Black Spirals so the largest spiral is in the top-right quadrant.
- Use the Shortest Ledge trick if icons are blurry: align the left side of the shortest rim ledge to 12 o'clock.
- Restart the game if the "Rotate" prompt fails to appear due to an interaction bug.
- Claim your Abyss Artifact for a permanent skill point and use the Memories of Abundance to reveal the map.
Once you have secured your skill point, consider heading further south to the Greymane region for the next set of Abyss trials.