Home
How to Find the Dragon Stone Chamber and Solve the Disk Puzzle in Crimson Desert
To complete the Dragon Stone Chamber in Crimson Desert, glide into the massive pit in Hernand Highlands (Thinker's Meadow). Push the mural on the northern wall to enter. Align the three rotating disks as follows:
- Left Disk (Scorpion): Point the claws Northwest (10-11 o'clock).
- Center Disk (Sun/Moon): Point the symbols North (12 o'clock).
- Right Disk (Spiral): Point the large spiral Northeast (2 o'clock).
If the "Rotate" prompt is missing, save and reload your game immediately to fix the interaction bug.
In the vast world of Crimson Desert , few environmental puzzles are as rewarding—or as technically finicky—as the Dragon Stone Chamber. Located deep within the Hernand Highlands, this ancient vault holds the key to mapping out the entire region. However, many players find themselves wandering the cliffs of Thinker's Meadow or staring at unresponsive stone disks without a clear path forward.
This guide provides a detailed walkthrough for locating the chamber, deciphering the distant mural clues, and utilizing community-discovered shortcuts to bypass the most tedious parts of the quest. Whether you are hunting for the Abyss Artifact or simply trying to clear the fog from your map, here is how to master the Dragon Stone Chamber.
Where is the Dragon Stone Chamber Located?
The Dragon Stone Chamber is not a traditional dungeon with a marked entrance on the main road. Instead, it is tucked away inside a geological anomaly in the Hernand Highlands . To find it, you should first navigate to the area known as Thinker’s Meadow , which sits between Hernand Town and the Greymane Camp (often referred to as Howling Hill).
The chamber is situated at the bottom of a massive natural chasm. As you approach the coordinates, you will see a sudden drop in the terrain—a jagged pit that looks like a scar on the landscape. According to Fusion Thunder , this pit is the primary landmark for the quest. You cannot simply walk into the chamber; you must use your glider to descend safely into the pit.
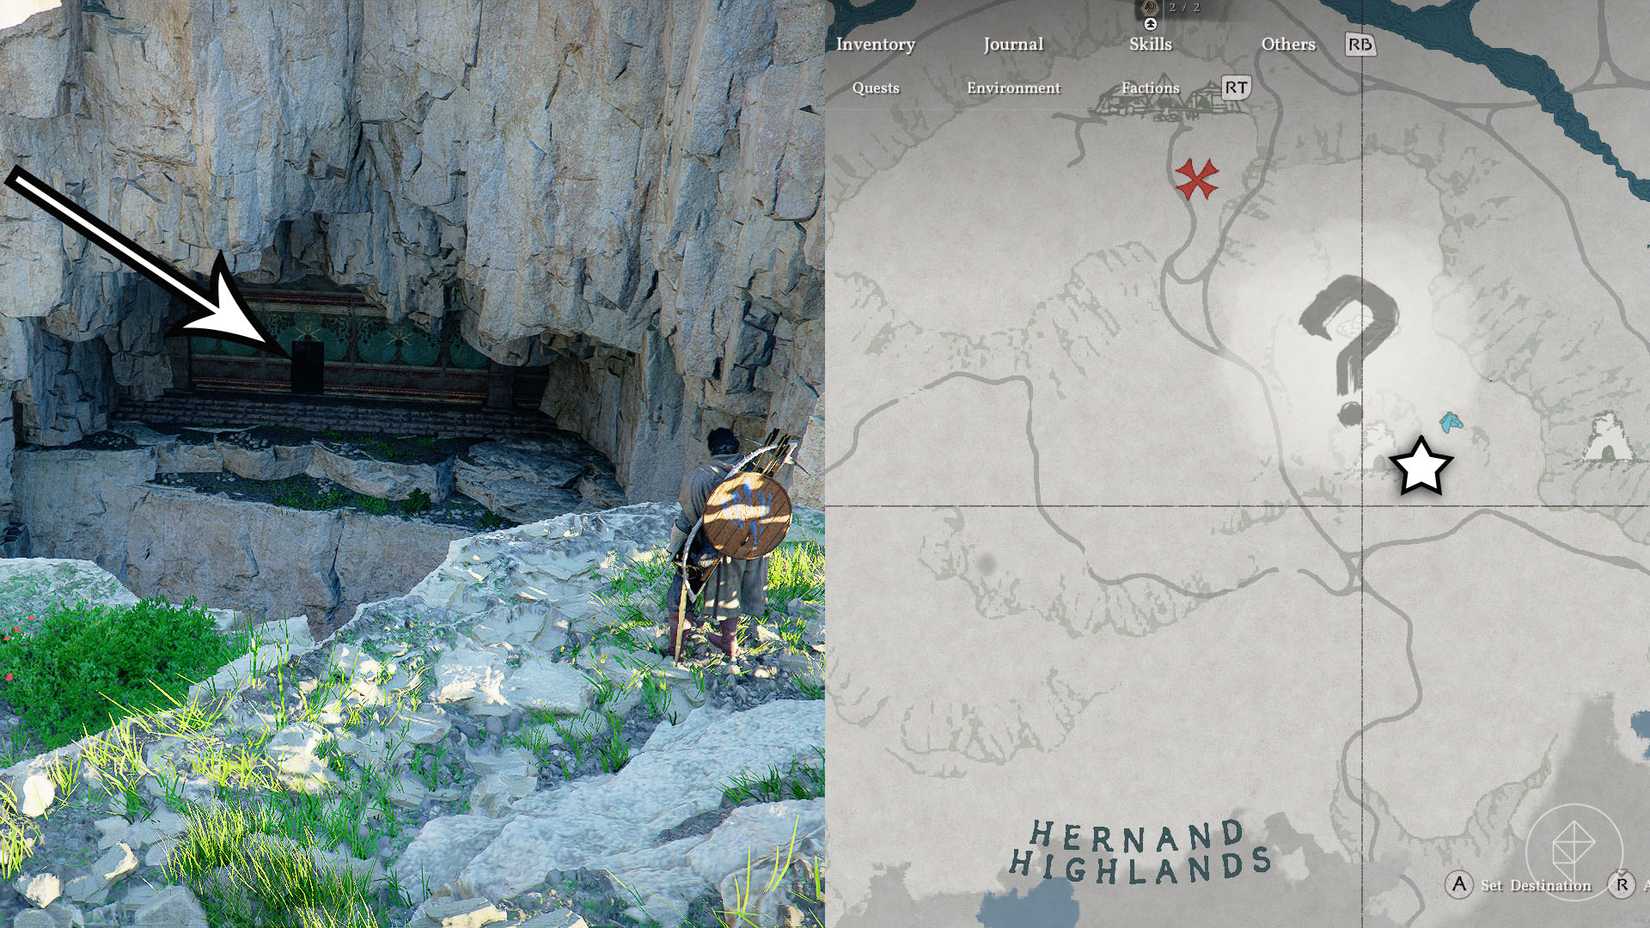
Image source: Polygon.com
Once you are inside the pit, look toward the northern rock face. You will notice a large, flat section of stone decorated with faded red paintings. This is the "Painted Door," the gateway to the puzzle room. If you are having trouble spotting it, look for the red pigment that stands out against the grey and brown stone of the chasm walls.
How to Open the Hidden Mural Door Entrance
A common point of frustration for players is the lack of a traditional "Open" or "Interact" prompt when standing in front of the mural door. Many assume they need a specific key or quest item to proceed. However, the entrance mechanic is purely physical.
Stand directly in front of the center-most section of the mural on the northern wall. Do not stand near the decorative edges, as the collision box for the trigger is quite specific.
Instead of waiting for a button prompt, move your character forward so they are walking directly into the wall. Hold this position for 3 to 5 seconds. Your character should transition into a "pushing" animation, and the stone block will slowly recede into the wall.
The door is on a timer. Once it is pushed back far enough, slip inside. If you wait too long, the stone may reset, requiring another push.
Some players have reported getting trapped inside the chamber if the door closes behind them. If this happens, do not panic. Use the "stab and pull" mechanic—strike the door block with your weapon and use the pull/push interaction to manually slide it back open. This community-verified fix prevents you from having to fast-travel out and lose your puzzle progress.
Where to Find the Three Mural Clues at Anvil Hill
Inside the chamber, you will find three rotating disks, but the clues for their orientation are located hundreds of meters away. These murals are found along the cliffs of Anvil Hill , northwest of the House of Healing. While you can solve the puzzle using our guide below, finding the murals is technically part of the "intended" experience.
| Mural Symbol | Location Details | Distance from Chamber |
|---|---|---|
| Sun and Moon | Near the northern rivulet, NW of House of Healing. | ~350m |
| Black Spirals | Northeast of the Sun mural on the same cliff face. | ~500m |
| Scorpion / Claw | Southwest of the other murals along Anvil Hill. | ~700m |
According to IGN , these murals can be difficult to see if your graphics settings are set to "Low," as the textures may fail to render properly. If the walls look blank, try increasing your texture quality temporarily.
How to Solve the Dragon Stone Chamber Disk Puzzle
The puzzle requires you to rotate three stone disks until they match the orientations found on the Anvil Hill murals. This puzzle is known for its "pixel-perfect" requirement; even a slight misalignment can prevent the door from opening. Many users find that they must "micro-rotate" the disks until they hear a distinct mechanical click.
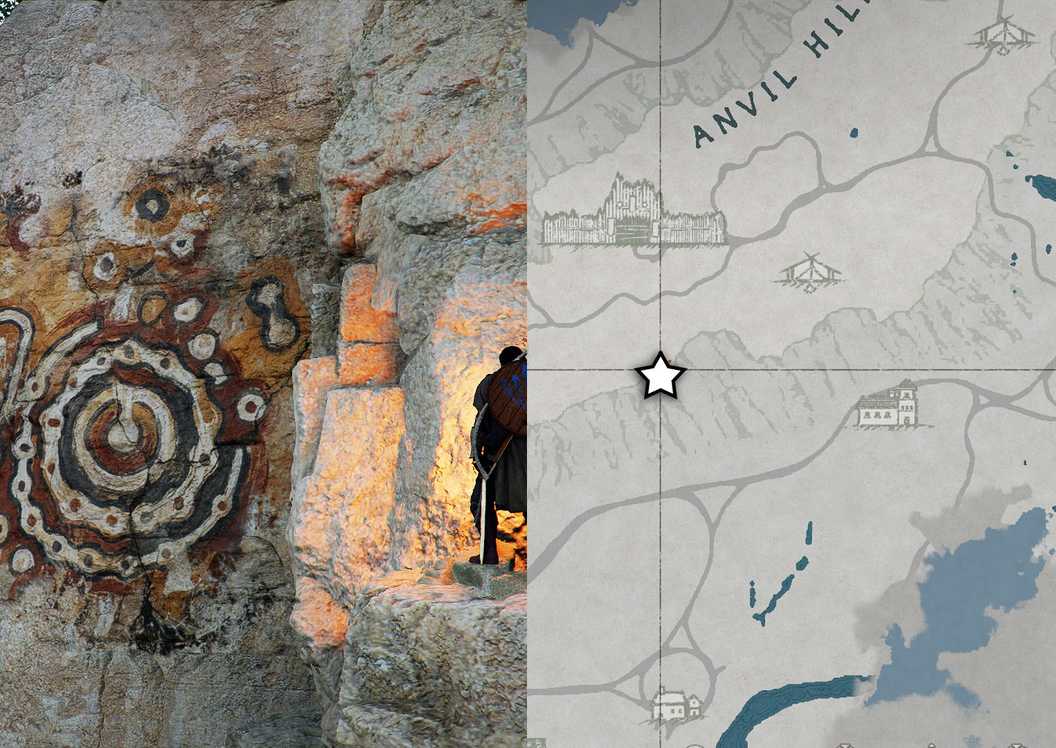
Image source: Polygon.com
1. The Left Disk (Scorpion/Claw)
This disk features a symbol that many players refer to as "Pincer Bacteria" or a "Scorpion." You need to rotate this disk so that the "claws" or the open end of the pincer is facing Northwest . On a standard clock face, this would be roughly the 10 or 11 o'clock position.
2. The Center Disk (Sun and Moon)
The center disk is the most straightforward. It features a sun and a crescent moon. These symbols should be aligned to face Direct North (the 12 o'clock position). Ensure the vertical axis of the symbols is perfectly straight.
3. The Right Disk (Spiral/Dragon)
The right-hand disk features a series of black spirals. The largest, most prominent spiral should be oriented toward the Northeast (the 2 o'clock position). This disk is often the one that causes the most trouble due to the ambiguity of the spiral shapes.
Use the Rim Cheat to Solve the Puzzle Without Mural Clues
If you find the mural clues too difficult to read or simply want to save time, the community has discovered a "backdoor" method known as the Rim Cheat . This strategy relies on the physical geometry of the stone plates rather than the symbols painted on them.
As noted in the CDguides community , each rotating plate has a series of stone ledges or "teeth" on its outer rim. These ledges are of varying lengths. To solve the puzzle instantly:
- Identify the shortest ledge on the outer rim of the plate.
- Rotate the plate so that the left edge of this shortest ledge is pointing exactly upward (12 o'clock).
- Repeat this for all three plates.
This physical marker is a developer-included failsafe that allows players to solve the puzzle even if their graphics settings make the mural symbols invisible. It is a top-tier strategy for players who want to bypass the 700m trek to Anvil Hill.
What to Do if the Rotate Prompt Does Not Appear
One of the most significant hurdles in the Dragon Stone Chamber is a technical glitch where the "Rotate" interaction prompt simply fails to appear when you approach the disks. This can make the puzzle seem impossible to complete.
If you cannot interact with the disks, follow these steps:
- Stand in the center of the puzzle room.
- Open your menu and perform a Manual Save .
- Immediately Reload that save file.
Accessibility for Colorblind Players
The clues for this puzzle rely heavily on red markings against brown stone. For players with red-green colorblindness, these markers can be nearly invisible. If you are struggling to see the symbols, we recommend temporarily switching your graphics preset to "Cinematic" or "High Contrast" if available. Alternatively, use the Rim Cheat mentioned above, as it relies on 3D geometry rather than color-coded textures.
What Rewards Do You Get for Completing the Chamber?
Completing the Dragon Stone Chamber is a significant milestone for character progression and world exploration. The rewards are split between immediate power gains and long-term utility.
- Abyss Artifact This is the primary treasure of the chamber. Interacting with the central altar after solving the puzzle grants you a permanent Skill Point , which is essential for unlocking high-tier combat abilities.
- Memories of Abundance This is a unique consumable item. When used, it reveals all hidden location markers, points of interest, and knowledge entries for the entire Hernand region . For completionists, this is one of the most valuable items in the game, as it saves hours of manual exploration.
Many players search for a legendary sword within this chamber, but it is important to clarify that the rewards are strictly the Artifact and the Memories item. While no weapon is found here, the skill point gain ranks among the top reasons to prioritize this chamber early in your journey.
Hidden Loot and Secondary Rewards Near the Chamber
Before you fast-travel out of the pit, there are several secondary rewards that most guides overlook. The chasm itself is rich in rare minerals that can be sold for a significant amount of silver.
At the very bottom of the pit—outside the puzzle chamber itself—you can find several Diamond Veins . Mining these requires a pickaxe of at least "Rare" quality, but the payoff is substantial. Diamonds are a top-tier trade commodity in Hernand Town. Additionally, a small cave system branches off from the bottom of the pit, leading to a hidden area where "Force Current" can be used to uncover a small silver cache.
Frequently Asked Questions
No, the chamber is entirely exploration-based. While some NPCs in Hernand Town may hint at its existence, you can find and solve the puzzle at any time once you have access to the Hernand Highlands region. It is a popular choice for early-game players looking to boost their skill points.
This is a community nickname for the Scorpion or Claw symbol found on the left-most disk. Because the ancient murals are somewhat abstract, players have come up with various names for them. If you see a guide mentioning "Bacteria" or "Horse Legs," they are referring to the Scorpion disk.
This is usually a texture streaming issue. If you are playing on "Low" graphics settings or an older HDD, the game may prioritize terrain geometry over mural textures. Try standing still near the mural for 30 seconds to let the high-res texture load, or temporarily increase your "Texture Quality" setting.
Yes. There is no "check" to see if you've visited Anvil Hill. You can enter the chamber and input the solution (Scorpion NW, Sun N, Spiral NE) immediately. Using the "Rim Cheat" is also a perfectly valid way to bypass the mural requirement.
Most players consider the reward highly valuable. The "Memories of Abundance" item effectively "completes" the map for the Hernand region, which is a massive time-saver for anyone aiming for 100% completion. The additional skill point from the Abyss Artifact is also a top-tier character upgrade.
Key Takeaways for the Dragon Stone Chamber
- Locate the pit in Hernand Highlands, southeast of Greymane Camp.
- Push the mural wall physically; do not wait for an interaction prompt.
- Fix the bug by saving and reloading if the "Rotate" prompt is missing.
- Align the disks precisely: Left (10 o'clock), Center (12 o'clock), Right (2 o'clock).
- Use the Rim Cheat by pointing the left side of the shortest rim ledge upward.
- Claim your rewards , including the Abyss Artifact and the Memories of Abundance.
- Mine the diamonds at the bottom of the pit before leaving the area.
By following these steps, you can efficiently clear one of the most complex environmental puzzles in the Hernand region and significantly boost your character's power.