Home
What Does Iron Look Like in Stardew Valley and Where Can You Find It?
Identifying Iron Nodes Ore and Bars at a Glance
Recognizing iron quickly is essential for progressing through the mid-game of Stardew Valley. As you transition from the copper-heavy early days to the need for Quality Sprinklers and Steel tool upgrades, knowing exactly what to look for will save you significant time and energy.
The Iron Node
Found within the Mines, the node is the raw source. It is a grey rock that stands out due to its jagged, silver-grey or light-blue bumps . Unlike standard rocks, it has a distinct 3D texture that makes it appear "encrusted" with metal.
The Iron Ore
Once you strike a node with your pickaxe, it drops Iron Ore. In your inventory, this appears as a jagged, dark grey lump . It is darker and more angular than the smooth, round appearance of Stone.
The Iron Bar
The finished product of smelting. It is a sleek, rectangular bar with a metallic sheen. Its color is a consistent silver-grey, distinguishing it from the orange of Copper or the bright yellow of Gold.
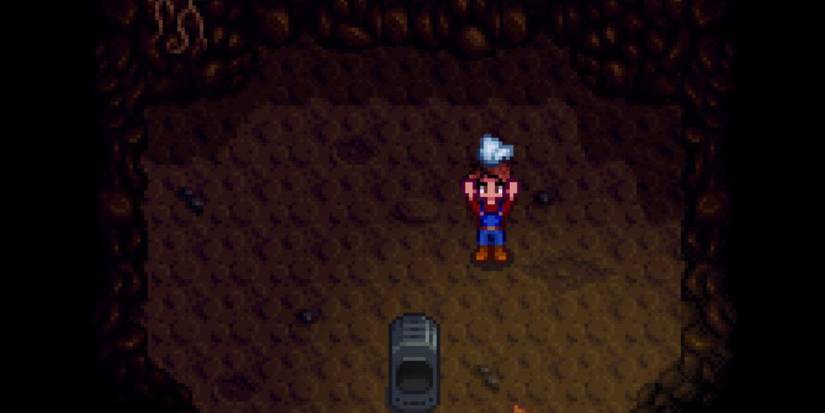
Image source: GameRant
According to the official Stardew Valley Wiki , iron nodes typically yield between 1 and 3 ore per break. If you have chosen the Miner profession , you have a chance to receive even more ore from a single node, making your trips to the mines much more productive.
Where Iron Ore Spawns in the Mines
Iron does not appear immediately when you enter the Mines. You must descend through the initial "Earth" levels (1-39) before you reach the environment where iron becomes common.
The Frozen Earth Levels
Iron begins to spawn consistently starting at Level 41 . Level 40 is a "safe" elevator floor with a chest, so the real work begins one floor down. The environment here changes drastically; the brown dirt is replaced by blue ice walls and snow-covered ground. This "Frozen Earth" biome continues until Level 79.
While iron can technically appear in later levels (80+), those floors are dominated by Gold Nodes. Therefore, the 41-79 range is widely considered the primary zone for iron acquisition. The density of nodes varies by floor, but you will generally find at least a few nodes on every level in this range.
The Quarry and Special Farm Maps
The Mines aren't the only place to find iron. Once you complete the Crafts Room bundles in the Community Center (or purchase the bridge repair from Joja), you unlock The Quarry . Iron nodes can spawn here daily, though they compete for space with copper, gold, and even rare mystic stones.
If you chose the Hill-top Farm or the Four Corners Farm , you have a dedicated mini-quarry area on your property. Iron nodes will begin spawning in these areas once your Mining level is high enough, providing a convenient way to gather resources without leaving home.
Distinguishing Iron Nodes from Regular Rocks
One of the most common pitfalls for new players is the "Camouflage Problem." In the frozen levels, the blue-ish tint of the iron shards can blend into the icy blue background of the mine walls. This is especially true in low-light conditions or if you haven't yet acquired a Glow Ring.
Visual Comparison Table
| Node Type | Base Color | Distinctive Feature | Pickaxe Hits (Standard) |
|---|---|---|---|
| Stone | Grey/Brown | Smooth or simple cracks | 1 Hit |
| Copper Node | Brown | Orange/Copper circular spots | 1-2 Hits |
| Iron Node | Grey | Silver/Blue jagged shards | 3 Hits |
| Gold Node | White/Grey | Bright yellow protrusions | 4 Hits |
As noted in the table, iron nodes are significantly tougher than stone or copper. While you can mine them with a starter pickaxe, it takes three hits, which can quickly drain your energy. Upgrading to a Copper Pickaxe reduces the effort required, making your farming runs much more sustainable.
Identifying Iron Bearing Crates and Barrels
Nodes are not the only way to get iron. As you explore floors 41 through 79, you will encounter wooden crates and barrels. These breakable containers are a top-tier source of "bonus" ore.
On these specific floors, the crates often appear as light-brown wooden boxes, sometimes reinforced with metal bands. Breaking them with your sword or pickaxe has a high probability of dropping 1-3 Iron Ore. In rare cases, you might even find a fully smelted Iron Bar inside, which is a significant find for early-game players.
Many players ignore these containers to focus solely on nodes, but breaking them is energy-free if you use your sword. This makes them an exceptionally efficient way to supplement your ore count while hunting for nodes.
How to Smelt Iron Ore into Iron Bars
Once you have gathered your ore, you need to process it. Raw ore has very few uses; the real value lies in the bars.
- The Smelting Recipe
- 5 Iron Ore + 1 Coal = 1 Iron Bar.
- The Furnace Requirement
- You must have a Furnace, which is crafted using 20 Copper Ore and 25 Stone. Clint the Blacksmith will give you this recipe the morning after you mine your first piece of Copper Ore.
- Processing Time
- It takes 2 in-game hours (approximately 90 seconds of real time) to smelt one Iron Bar. This is relatively fast compared to Gold or Iridium.
Smelting is a fundamental mechanic for progression. Iron bars are required for Steel Tool Upgrades , which cost 5,000g and 5 Iron Bars per tool. They are also essential for crafting Quality Sprinklers , which are widely regarded as one of the most important items for scaling your farm's profitability.
The Most Efficient Floors for Farming Iron Ore
If you need a large amount of iron quickly, simply walking through the mines floor by floor is not the most effective method. Instead, veteran players use the "Elevator Hop" strategy.
Top Recommended Farming Floors
- Floor 41: This is the first floor after the elevator. It is often small and easy to scan quickly. If you don't see any iron nodes immediately, you can head back up the ladder and reset the floor.
- Floor 55: This floor frequently features a high concentration of nodes and a relatively open layout, making it easy to spot ore from a distance.
- Floor 61: Another elevator-adjacent floor that often spawns multiple nodes in a tight cluster.
The Dust Sprite Bonus
Farming iron on floors 41-79 offers a unique advantage: Dust Sprites . These small, bouncing black creatures are a leading source of Coal. Since every iron bar requires coal to smelt, hunting Dust Sprites while you mine iron nodes solves two problems at once.
Furthermore, if you slay 500 Dust Sprites, you complete a Monster Eradication Goal at the Adventurer's Guild. The reward is the Burglar's Ring , which causes monsters to drop twice as much loot. This makes future iron and coal farming runs even more productive.
Alternative Ways to Get Iron Without Mining
Not every player enjoys the combat and grind of the Mines. Fortunately, Stardew Valley offers several alternative paths to acquiring iron.
Buying from Clint
In Year 1, Clint sells Iron Ore for 150g each. In Year 2 and beyond, the price increases to 250g. While expensive, this is a fast way to get bars if you have excess gold from crops.
Transmutation
At Mining Level 4, you unlock the "Transmute (Fe)" recipe. This allows you to turn 3 Copper Bars into 1 Iron Bar. This is useful if you have a massive surplus of copper from the early levels.
Recycling Trash
Using a Recycling Machine on "Trash" items (like iron cans) found while fishing or in Crab Pots can occasionally yield Iron Ore or even an Iron Bar.
Additionally, certain enemies in the deeper levels of the mines, such as Shadow Brutes and Shadow Shamans , have a small chance (roughly 2%) to drop a finished Iron Bar upon defeat. While not a reliable primary source, it is a nice bonus during deep dives.
Deciding Whether to Buy Mine or Transmute Iron
Which method is right for you? It depends on your current stage in the game and your financial situation.
Mining is almost always the most cost-effective method in terms of gold, but it costs time and energy. If you are early in the game and trying to save every penny for seeds, mining is your only real option.
Buying becomes a viable strategy in Year 2. By this point, your farm should be generating enough profit that spending 1,250g for the ore needed for one bar (5 ore x 250g) is a minor expense compared to the time saved. This is a top choice for players who want to focus on decorating or socializing rather than combat.
Transmuting is generally the least efficient method. Copper bars sell for 60g each (180g for three), while an Iron Bar sells for 120g. You are essentially losing 60g of value per transmutation. Only use this if you have hundreds of copper bars and zero interest in going back to the early mine levels.
Frequently Asked Questions
Can I mine iron with the starter pickaxe?
Why can't I find any iron on Floor 40?
Does daily luck affect how much iron I find?
What is the fastest way to get 5 Iron Bars for a tool upgrade?
Can I find iron in the Secret Woods or Cindersap Forest?
Key Takeaways for Finding Iron
- Visual Cues: Look for grey rocks with silver-blue jagged shards on floors 41-79.
- Primary Location: The "Frozen Earth" levels of the Mines are the most reliable source.
- Farming Strategy: Use the elevator to cycle through floors 41, 55, and 61 for maximum efficiency.
- Secondary Sources: Break wooden crates and barrels on iron-bearing floors for extra ore and bars.
- Enemy Drops: Kill Dust Sprites to gather the Coal needed for smelting while you hunt for iron.
- Alternatives: If you prefer not to mine, buy ore from Clint or use the Recycling Machine on trash items.
- Tool Upgrades: Prioritize the Steel Pickaxe and Quality Sprinklers as your first iron-based projects.
Start your next mining run on a high-luck day to maximize your iron yield and speed up your farm's progression.