Home
How to Unlock the Mines and Reach Floor 120 in Stardew Valley
Mining is a foundational pillar of progression in Stardew Valley. Whether you are looking for copper to build your first furnace or gold for high-efficiency sprinklers, the mines provide the raw materials necessary to transform a struggling farm into a thriving estate. However, the deeper you go, the more dangerous the environment becomes, requiring a mix of tactical combat, resource management, and efficient pathfinding.
In this guide, we will explore the mechanics of the mines, from the initial unlock sequence to advanced strategies for reaching the bottom. We will also cover specific updates found in Version 1.6 to ensure your mining trips are as productive as possible.
When and How Do the Mines Open?
When you first arrive in Pelican Town, the path to the mines is physically blocked. A large rockslide, caused by Joja Corp's drilling operations, prevents access to the mountain area northeast of the Carpenter's Shop. You cannot clear this debris yourself; instead, you must wait for the game's internal clock to trigger the event.
On Spring 5 , you will receive a letter in the mail from Joja Corp apologizing for the inconvenience and stating that the debris has been cleared. This is your signal that the mines are now accessible. According to the official Stardew Valley Wiki , the mines are located in the North Mountains, just past the bridge near the Adventurer's Guild.
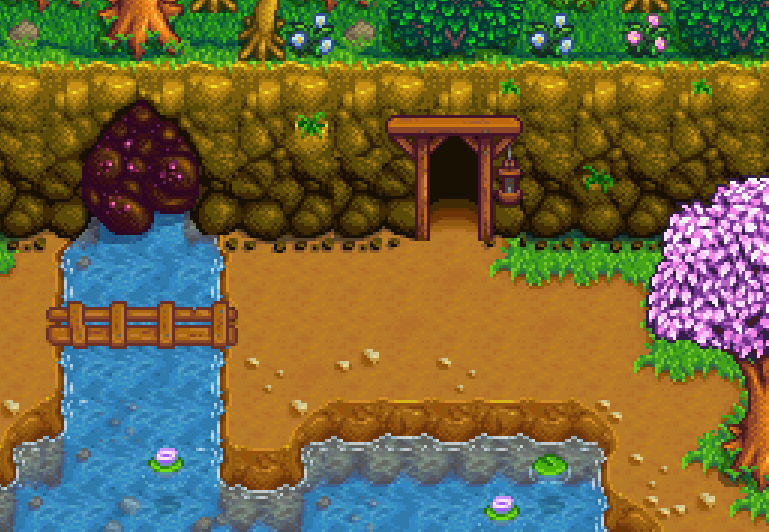
Image source: Stardew Valley Wiki
Upon entering for the first time, you will trigger a cutscene with Marlon, the leader of the Adventurer's Guild. He will give you a Rusty Sword , which is essential for defending yourself against the slimes and insects that inhabit the upper floors. While the Rusty Sword is a basic weapon, it is sufficient for the first 10 to 20 floors of the mine.
How the Elevator System Saves Your Progress
The mines consist of 120 unique floors, but you are not expected to clear them all in a single day. The Elevator System is a vital mechanic that records your progress in five-floor increments. Every time you reach a floor ending in 0 or 5 (e.g., 5, 10, 15, 20), the elevator "saves" that floor.
When you return to the mines on a subsequent day, you can interact with the elevator at the entrance to immediately jump to the deepest milestone you have reached. This allows you to focus your energy on new floors rather than re-clearing areas you have already conquered. Reaching Floor 120 is a major milestone, as it grants you the Skull Key, which is required to access the late-game desert dungeon.
It is generally recommended to aim for at least 5 floors per trip. If you reach Floor 9 at 10:00 PM, it is often worth pushing through to Floor 10 just to unlock the next elevator stop, even if your energy is low. This "milestone-focused" approach is widely considered one of the most efficient ways to progress through the early game.
What Should You Bring on Your First Mining Trip?
Inventory management is a common hurdle for new miners. Between ores, stones, geodes, and monster loot, your pockets will fill up quickly. To maximize your efficiency, follow the Entrance Chest Hack : place a wooden chest right next to the elevator at the mine entrance. Before you head down, dump your non-essential tools—like the watering can, axe, and hoe—into this chest. This frees up 3-4 slots for valuable loot.
Essential Inventory Checklist
- Pickaxe: Your primary tool for breaking rocks and finding ladders.
- Sword: Necessary for combat; using a sword does not consume energy.
- Food: Energy is your most limited resource. Early on, Field Snacks (crafted from tree seeds) and Spring Onions (found in the forest) are excellent choices.
- Torches: Some floors are dark; you can craft these or pick them up from the walls of the mine.
As you progress, the choice between upgrading your backpack or your pickaxe becomes critical. While more slots are helpful, a Copper Pickaxe reduces the number of swings needed for most rocks, significantly extending your daily energy pool. Many experienced players prioritize the pickaxe upgrade as soon as they have 5 copper bars and 2,000g.
Where to Find Copper, Iron, and Gold Ores
The mines are divided into three distinct thematic zones, each spanning 40 floors. The type of ore you find is strictly tied to these zones. If you are looking for a specific material, you must be in the correct floor range.
| Ore Type | Floor Range | Theme | Primary Use |
|---|---|---|---|
| Copper | 1–39 | Brown Earth | Furnaces, Basic Tool Upgrades |
| Iron | 40–79 | Frozen / Ice | Quality Sprinklers, Bee Houses |
| Gold | 80–120 | Lava / Fire | Advanced Sprinklers, Crystalariums |
Each zone also features unique monsters and environmental hazards. The Frozen floors (40-79) are home to Dust Sprites, which are a top-tier source of coal. The Lava floors (80-120) are significantly more dangerous, featuring Magma Sprites and Shadow Brutes that can quickly deplete your health if you are not careful.
Pro Strategies to Save Energy and Mine Faster
To reach the bottom of the mines quickly, you must move beyond basic rock-breaking. Advanced players use several techniques to conserve energy and optimize their time.
The Sword-Ping Test
Stone Crabs are enemies that disguise themselves as normal rocks. If you hit them with a pickaxe, you waste energy. Instead, swipe at suspicious rocks with your sword. If the sword "pings" or shows a zero-damage indicator, it is a Stone Crab. You can then kill it with your sword (which costs zero energy) to potentially reveal a ladder.
Focusing on XP Rocks
Not all rocks are created equal when it comes to Mining XP. Standard light-grey rocks often provide no experience at all. To level up your mining skill faster, prioritize Dark Grey Rocks . These typically require two hits with a basic pickaxe but are guaranteed to provide Mining XP. According to community testing, focusing on these nodes is a significant advancement for players trying to reach Level 10 Mining before the end of the first year.
How to Farm Coal and Iron Efficiently
Once you reach the middle floors, you will find that Coal becomes a major bottleneck for crafting. The most effective way to farm coal is the Dust Sprite Loop . Dust Sprites have a high chance of dropping coal and are found in high concentrations on floors 41 through 79.
To execute this loop, take the elevator to Floor 40, walk down to Floor 41, and clear all Dust Sprites. If you find a ladder quickly, check Floor 42. Once the floor is clear, leave the mines and immediately take the elevator back to Floor 40 to reset the spawns. This method is widely regarded as a top choice for gathering the 500 coal needed for the Burglar's Ring quest.
If you are struggling to reach the gold-rich floors (80+), you can use the Transmutation Hack . Once you reach Mining Level 4, you unlock the recipe to turn Iron Bars into Gold Bars. While it is resource-intensive, it allows you to craft Quality Sprinklers earlier than usual, which can be a major improvement for your farm's automation.
What Happens if You Die or Pass Out in the Mines?
There is a significant difference between "passing out" due to time and "dying" due to health loss. Understanding the math behind these penalties can help you make better decisions late at night.
- Exhaustion / 2:00 AM: If you stay in the mines until 2:00 AM, you will pass out. You will lose 10% of your current gold, capped at a maximum of 1,000g. You do not lose any items.
- Health Depletion (Death): If a monster reduces your health to zero, the penalty is much harsher. You can lose up to 15,000g and several stacks of items from your inventory.
The 2:00 AM Strategy is a popular choice for players with very little gold. If you have 0 gold, 10% of 0 is still 0. In this scenario, it is mathematically better to stay in the mines until the very last second to find one more ore node, as you lose nothing by passing out. If you do lose a valuable item during a health-related death, you can visit Marlon at the Adventurer's Guild to use the Item Recovery Service , though he can only retrieve one item stack for a fee.
How to Handle Difficult Floors and Monsters
Some floor layouts are designed to be "energy sinks." The most notorious is the Spiral Floor (often seen on Floor 19). These floors require you to break a massive number of rocks to navigate to the center. To maintain your "5 floors per day" pace, it is highly recommended to use a crafted Staircase (99 stone) to skip these layouts entirely.
Recommended Weapon Progression
To avoid spending your hard-earned gold at the Adventurer's Guild, follow this free weapon path:
- Steel Smallsword: Received as a reward for reaching Floor 20.
- Insect Head: Earned by killing 125 Insects (found on floors 1-30) and speaking to Marlon. This weapon ranks among the top early-game options.
- Obsidian Edge: Found in a chest on Floor 90. This sword is exceptionally strong and will carry you to Floor 120.
If you find yourself running low on energy mid-day, don't forget the Spa Pitstop . Once the earthquake occurs in Summer of Year 1, the Spa near the railroad opens. Standing still in the pool water refills your energy and health for free, allowing you to return to the mines for a "second shift" in the evening.
Troubleshooting Common Mining Issues in Version 1.6
The 1.6 update brought many improvements to Stardew Valley, but it also introduced some nuances for miners. In recent months, players have reported a "Frozen Floor" bug in multiplayer sessions, particularly in local split-screen. This glitch can cause monsters or items to become non-interactive. If this happens, the most reliable fix is to have all players exit the mine and re-enter to reset the floor state.
Additionally, Version 1.6.9+ has adjusted ladder spawn rates. If you clear an entire floor and no ladder appears, check the very edges of the map; ladders can sometimes be obscured by the UI or wall decorations. Remember that killing enemies provides a "stamina-free" chance for a ladder to spawn, so always clear the monsters before you start dumping energy into rocks.
Frequently Asked Questions
- How do I clear the rocks blocking the mine entrance?
- You cannot clear them manually. You must wait until Spring 5, at which point you will receive a letter from Joja Corp explaining that the debris has been removed. This is a scripted event that happens in every playthrough.
- Do the mines only go to level 120?
- Yes, the standard mines end at Floor 120. However, reaching the bottom rewards you with the Skull Key, which allows you to enter the Skull Cavern in the Calico Desert. The Skull Cavern is an infinite dungeon with much higher difficulty and better rewards.
- What is the best food for mining early on?
- While "best" is subjective, Salads purchased from Gus at the Saloon offer a highly effective energy-to-gold ratio. For free options, Salmonberries (available Spring 15-18) are a popular choice because you can collect hundreds of them in just a few days.
- Why can't I find any Iron Ore?
- Iron Ore only begins to appear consistently once you reach Floor 40 . The environment will change to a frozen/blue theme, signaling that you are in the correct range for iron nodes and Dust Sprites.
- Does daily luck affect the mines?
- Yes, significantly. Checking the Fortune Teller on your TV in the morning will tell you your luck for the day. On "high luck" days, ladders appear much more frequently, and you have a better chance of finding geodes and ore veins.
Key Takeaways for Efficient Mining
- Unlock the mines on Spring 5 after the Joja Corp debris is cleared.
- Use the elevator every 5 floors to save your progress and return quickly.
- Place a chest at the mine entrance to manage your inventory and maximize loot space.
- Target specific floors for ore: 1-39 for Copper, 40-79 for Iron, and 80-120 for Gold.
- Farm Dust Sprites on floors 41-79 to gather Coal and Iron efficiently.
- Skip spiral floors using crafted staircases to save time and energy.
- Check your luck on TV; only go for deep pushes on days when the spirits are happy.
Start your next mining trip by checking the TV for a high-luck day and packing at least ten Field Snacks to ensure you hit your next elevator milestone.