Home
How to Design Efficient Stardew Valley Keg Shed Layouts for Maximum Profit
Why Layout Efficiency Is the Key to Your Farm's Millions
In Stardew Valley, the keg is widely regarded as one of the most effective tools for wealth generation. By transforming raw fruit into wine, a keg applies a 3x multiplier to the base value of the crop. For high-value items like Ancient Fruit or Starfruit, this process turns a significant profit into an astronomical one. According to economic benchmarks from the Steam community , a setup of 200 kegs processing Ancient Fruit can generate approximately 460,000g every single week.
However, as your farm scales, the bottleneck shifts from "how many crops can I grow" to "how quickly can I process them." This is where layout efficiency becomes critical. A poorly designed shed might force you to retrace your steps or struggle with reaching machines in corners, wasting precious in-game hours. In a game where time is the only non-renewable resource, optimizing your movement flow is just as important as maximizing machine density.
The 1.6 update introduced several changes that impacted the "meta" for keg storage. From new building capacities to specific reach mechanics on mobile devices, staying current with the latest blueprints ensures you aren't leaving money—or time—on the table. Whether you are a casual player looking for a cozy brewery or a min-maxer aiming for perfection, choosing the right layout is the foundation of a successful late-game farm.
The Standard 137-Keg Big Shed Layout for Maximum Density
The Big Shed is the workhorse of the Stardew Valley industrialist. With an internal space of 17x12 tiles, it offers a significant upgrade over the basic shed. The most common blueprint, often cited as the standard for density, fits exactly 137 kegs into this space.
The "Wiki-Optimal" Blueprint
This layout utilizes two-wide vertical columns of kegs separated by single-tile walkways. By placing kegs back-to-back, you ensure that every machine is accessible from a path. According to the Stardew Valley Wiki , this 137-keg configuration is the baseline benchmark for maximizing a Big Shed's internal area.
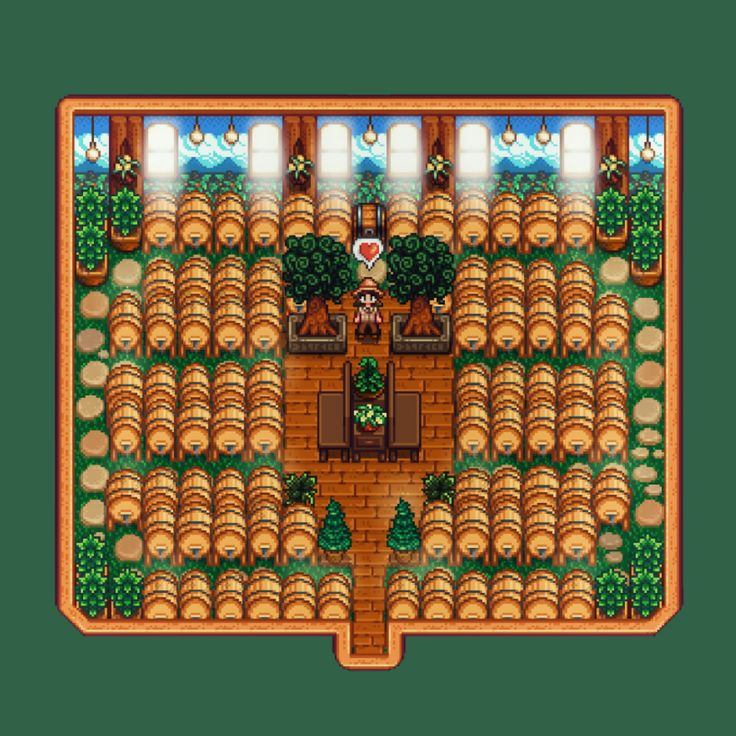
Image source: Pinterest
While this layout is exceptionally strong for raw yield, it does come with a movement penalty. Because the vertical rows are "dead ends," you must walk into each row to fill the kegs and then walk back out the same way to reach the next row. This "double-backing" can add 15 to 20 seconds to every harvest cycle. For a farm with ten sheds, that is over three minutes of real-world time spent simply walking over the same tiles twice.
Why the 135-Keg S-Curve Layout Is Better for Real Players
For many veteran players, the trade-off between absolute density and movement flow is a simple choice. The 135-keg "S-Curve" layout is a popular choice for those who value their time. By removing just two kegs from the standard 137-keg blueprint, you can create a continuous, winding path that allows you to enter the door, walk a single line through the entire building, and exit without ever retracing your steps.
The Flow vs. Yield Trade-off
Losing two kegs might seem like a waste, but the math suggests otherwise. Two bottles of Starfruit Wine (with the Artisan profession) are worth roughly 4,500g. In the late game, 4,500g is a negligible amount compared to the 15-20 seconds saved per shed. Community testing on Reddit suggests that this variation is preferred by players managing large-scale operations because it reduces the mental fatigue of harvesting.
How to Implement S-Curve Pathing
To build the S-curve, you arrange your kegs in horizontal rows rather than vertical columns. You leave a gap at the end of the first row on the right, a gap at the end of the second row on the left, and so on. This creates a "snake" pattern. This layout also makes it easier to use the "Horizontal Strafe" technique, where you hold the action button while walking between two rows to fill both simultaneously.
How to Fix Keg Reach Issues on Stardew Valley Mobile
Mobile players face unique challenges due to touch-control limitations. Unlike PC players, who can use a mouse to click precisely on a diagonal tile, mobile players often rely on an automated pathfinding system or a joystick that struggles with corner interaction. In the 1.6 update, this issue was exacerbated by changes to the interaction radius on touch devices.
The "Mobile-Safe" Blueprint
If you are playing on an iPad or iPhone, the "optimal" 137-keg layout will likely frustrate you, as you will find yourself unable to harvest the kegs tucked into the far corners of the rows. To fix this, follow these adjustments:
- Avoid Corner Placements: Remove any keg that requires a diagonal reach. This usually means leaving the very last tile of every internal row empty.
- Wider Paths: Ensure your walkways are a full tile wide and do not require "U-turns" around a single machine.
- Sacrifice for Reliability: While you may lose 10-12% of your total density, you gain 100% harvest reliability, preventing the frustration of "stuck" wine that you cannot reach.
Using Renovated Cabins to Fit Over 500 Kegs on Your Farm
One of the most significant advancements in the 1.6 update meta is the realization that cabins are among the most space-efficient buildings in the game. While a Big Shed takes up 21 tiles of farmland and holds 137 kegs, a fully renovated cabin takes up only 15 tiles and can hold a staggering 593 kegs .
The Single-Player Cabin Strategy
Cabins are intended for multiplayer, but solo players can easily take advantage of them. By starting a local co-op session and joining as a second player (even briefly), you can place a cabin and then have Robin upgrade it. Once fully renovated, the interior space includes a basement and multiple rooms, providing a massive area for keg placement. This strategy is a top-tier choice for players who want to maximize every square inch of their farm footprint.
Comparing Sheds, Barns, and Cabins for Keg Storage
Choosing the right building depends on your current resources and game stage. While the Big Shed is the standard, Deluxe Barns are a popular alternative because many players already have them for livestock. The following table compares the efficiency of each building type based on Wiki data and internal dimensions.
| Building Type | Max Keg Capacity | Farmland Footprint | Kegs Per Tile |
|---|---|---|---|
| Standard Shed | 67 | 21 Tiles | 3.19 |
| Big Shed | 137 | 21 Tiles | 6.52 |
| Deluxe Barn | 136 | 28 Tiles | 4.85 |
| Renovated Cabin | 593 | 15 Tiles | 39.53 |
As the data shows, the renovated cabin is the undisputed king of space efficiency. However, the Big Shed remains a popular choice because it is easier to manage and does not require the "co-op trick" to fully utilize. Deluxe Barns are a strong contender if you are transitioning away from animals and want to repurpose existing structures without spending gold on new construction.
Pro Tips for Filling and Harvesting Your Kegs Faster
Once you have selected your layout, implementing a few advanced techniques can significantly speed up your weekly routine. These tips are used by high-level players to maintain a 100% uptime keg cycle regardless of the season.
The Horizontal Strafe Technique
Movement mechanics in Stardew Valley favor horizontal travel. When you walk horizontally between two rows of kegs, you can hold the "action" button (Right-click on PC, A on Controller) and move your character steadily. Your character will automatically interact with the kegs above and below them as they pass. This is much faster and more reliable than vertical movement, which often results in missed machines due to the character's hitbox alignment.
The "Pierre’s Missing Stock List" Workflow
To keep your kegs running year-round, you need a steady supply of seeds. By purchasing "Pierre’s Missing Stock List" for 50 Qi Gems in the Walnut Room, you can buy seeds from Pierre regardless of the current season. This allows you to buy Starfruit seeds in Winter, ensuring that as soon as Spring 1 arrives, you are ready to plant and harvest, keeping your brewery at maximum capacity 28 days a month.
Using Visual Indicators
Never waste time walking into a shed just to check if the wine is done. Place a single "indicator keg" outside the shed door and fill it at the same time as the ones inside. When the indicator keg shows a finished icon, you know the entire shed is ready for harvest. This simple trick saves countless trips and helps you stay on top of your production schedule.
Frequently Asked Questions
Key Takeaways for Optimal Shed Design
- Prioritize the Big Shed for a balance of cost, footprint, and a high capacity of 137 kegs.
- Use the S-Curve layout (135 kegs) if you want to maximize real-world time efficiency and movement flow.
- Avoid corner placements on mobile to prevent reach bugs introduced in the 1.6 update.
- Leverage Renovated Cabins for a massive 593-keg capacity if you are a late-game player looking for maximum space efficiency.
- Implement the "Indicator Keg" trick by placing one machine outside to signal when the batch is finished.
- Master the Horizontal Strafe to fill two rows of kegs simultaneously, cutting your harvest time in half.
Start by upgrading your basic shed to a Big Shed today to immediately double your processing power and farm revenue.