Home
How to Find and Unlock the Mines in Stardew Valley
The Mines are located in the North-East Mountain region , just past Robin’s Carpenter Shop. The entrance is physically blocked by a boulder until the morning of Spring 5, Year 1 . Once you receive a letter from Joja Corp regarding the landslide clearance, you can enter to meet Marlon, receive your first sword, and begin your descent through all 120 floors.
Where Are the Mines Located on the Map?
Navigating the sprawling landscape of Pelican Town can be daunting for a new farmer. To find the Mines, you must head to the Mountain map , which is the area directly north of the town center and your farm. If you are starting from your farmhouse, the most direct route is to walk north past the bus stop and follow the path toward the Carpenter’s Shop, where Robin and Demetrius live.
Once you reach Robin’s house, continue heading east. You will cross a small wooden bridge spanning a narrow section of the mountain lake. The Mine entrance is tucked into the rock face on the northern side of this lake. It is situated just west of the Adventurer’s Guild building and slightly north of Linus’s tent. According to the official Stardew Valley Wiki , this location serves as the primary hub for gathering ores, gems, and monster loot throughout the early and mid-game.
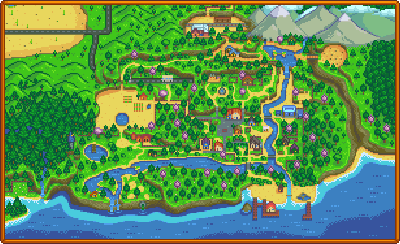
Image source: Stardew Valley Wiki
For players who prefer visual waypoints, look for the following landmarks:
- Robin’s House: The large building with the orange roof.
- The Mountain Lake: The large body of water where Sebastian often hangs out.
- The Wooden Bridge: The crossing that leads toward the eastern rock face.
Why Is the Path to the Mines Blocked?
If you attempt to visit the Mines during your first four days on the farm, you will find the path completely obstructed by a large pile of debris and a massive boulder. This is a deliberate time-gate designed to let players focus on basic farming mechanics and town introductions before diving into combat and resource extraction.
The "landslide" is a scripted event. On the morning of Spring 5, Year 1 , you will find a letter in your mailbox from Morris, the Joja Corp representative. The letter explains that Joja Corp has cleared the landslide caused by their drilling operations. This notification serves as your official "unlock" for the mining area. While some players might not check their mail until Day 6, the path is physically open as soon as the sun rises on the 5th.
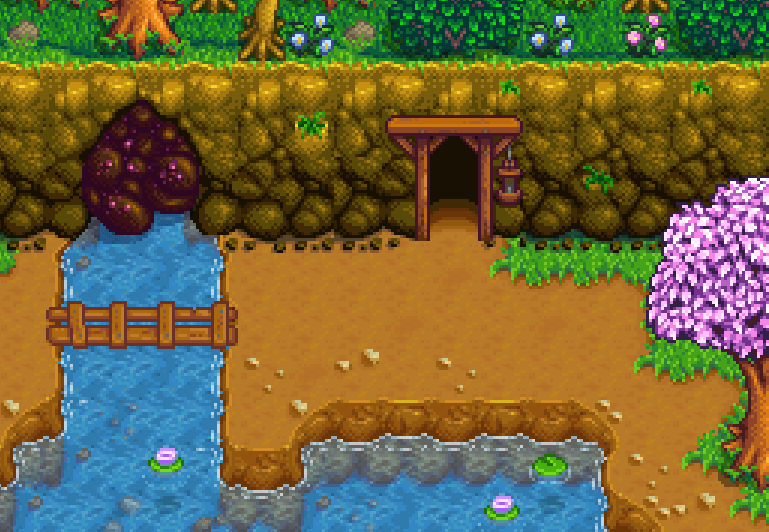
Image source: Stardew Valley Wiki
It is important to note that this unlock is permanent. Once the boulder is gone, it never returns, allowing you free access to the mountain cave system for the rest of your playthrough. If you find the path still blocked after Day 5, ensure you have actually triggered the letter event by checking your mailbox at the farm.
What Happens During Your First Visit to the Mines?
Stepping into the Mines for the first time triggers a unique cutscene. You will encounter Marlon , the rugged leader of the Adventurer's Guild. He explains that the cave is dangerous and filled with monsters, but also holds vast riches for those brave enough to explore its depths.
During this interaction, Marlon provides you with your first weapon: the Rusty Sword . While this blade is far from a top-tier option, it is essential for surviving the initial floors populated by Green Slimes and small Bugs. Marlon also gives you a task: reach the lower levels and prove your worth. This eventually leads to the "Initiation" quest, which requires you to slay 10 slimes before you are allowed to enter the Adventurer's Guild building next door.
Many players find that their first trip is short-lived due to limited inventory space and low energy. It is widely regarded as a top-tier choice to focus on reaching Floor 5 as quickly as possible during this first visit to activate the elevator system, which we will discuss in the next section.
How to Use the Elevator to Save Your Progress
One of the most frequent frustrations for new players is the feeling that they have to restart from the beginning every time they enter the cave. However, the Mines feature a highly impactful progression system: the Elevator . Located at the back of the entrance lobby (Floor 0), the elevator allows you to warp to any floor you have previously "unlocked."
The Multiples of Five Rule
The elevator only stops at floors that are multiples of five (5, 10, 15, etc.). To unlock a new stop, you must manually reach that floor by descending through the ladders. Once you step off the ladder onto Floor 5, for example, a distinct "ding" sound plays, indicating that the elevator stop is now active. You can then leave the mines and return directly to Floor 5 at any time.
Fixing the "Not Working" Message
When you first interact with the elevator on Day 5, you will receive a message stating it is "not working." This is not a bug. The elevator remains broken until you reach Floor 5 for the first time. Once you hit that milestone, the machine powers up. According to discussions on the Stardew Valley Reddit community , some players mistakenly ignore the elevator for years, thinking it requires a complex repair quest like the Community Center. In reality, it is a simple progression reward.
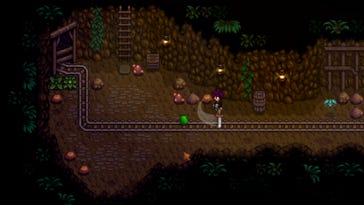
Image source: IGN
Essential Items to Pack for Your First Mining Trip
Preparation is key to a successful "dive." Because your inventory space is extremely limited in the early game (only 12 slots), you must be selective about what you carry. Bringing your entire toolset is a common mistake that leads to leaving valuable ores behind.
Managing Energy and Health
Mining is energy-intensive. Every swing of the pickaxe consumes stamina, and taking damage from monsters drains your health. In the early Spring, Field Snacks (crafted from one Acorn, one Maple Seed, and one Pine Cone) are a popular choice for energy recovery. They are free to make and provide a decent boost.
Another advanced technique involves the Spa Energy Loop . Once the earthquake occurs on Summer 1, Year 1, the Spa (located just north of the Mines) becomes accessible. You can spend the morning mining until your energy is low, walk to the Spa to refill your stamina for free by standing still in the water, and then return to the Mines for a second "dive" in the afternoon. This strategy ranks among the top methods for reaching the bottom of the mines before the end of the first year.
How to Reach the Bottom of the Mines Quickly
The Mines consist of 120 floors, divided into three distinct thematic zones. Each zone features different ores, monsters, and environmental hazards. Understanding these zones helps you plan which tools to upgrade and when.
| Zone Type | Floors | Primary Ore | Recommended Pickaxe |
|---|---|---|---|
| Earth | 1 - 39 | Copper | Basic / Copper |
| Frozen | 40 - 79 | Iron | Copper / Steel |
| Lava | 80 - 120 | Gold | Steel / Gold |
The Floor 80 "Sweet Spot"
For most players, reaching Floor 80 is the primary goal of the early game. This is where Gold Ore begins to appear consistently. Gold is a critical component for crafting Quality Sprinklers , which automate your farm's watering and allow you to scale your profits significantly. Reaching this milestone is a major improvement to your farm's efficiency.
Ladder RNG and Efficiency Mechanics
Finding the ladder to the next floor is governed by Random Number Generation (RNG), but you can influence the odds. According to expert mining guides , killing enemies is a "stamina-free" way to hunt for ladders. Every monster has a chance to drop a ladder upon death. Conversely, breaking rocks costs energy. If you are low on stamina but have plenty of health, focus on clearing monsters to find your way down.
What to Do If You Pass Out or Lose Your Items
The Mines are dangerous, and "dying" (losing all health) has significant consequences. If your health bar hits zero, you will wake up in the entrance lobby or the clinic, having lost a portion of your gold and several random items from your inventory. While your tools (Pickaxe, Axe, etc.) are never lost permanently, your weapons, rings, and hard-earned ores can vanish.
Marlon’s Item Recovery Service
If you lose a valuable item, such as a high-level sword or a stack of 50 Iron Ores, you can visit the Adventurer's Guild next door. Marlon offers an Item Recovery Service that allows you to buy back one of the items you lost during your last collapse. The price is equal to the item's base sell value. Note that you can only recover one item per "death," so choose the most valuable or rarest one.
The 2:00 AM Rule
It is vital to distinguish between passing out from Health Loss versus Exhaustion/Time .
- Health Loss: You lose items and a large chunk of gold (up to 15,000g).
- Time (2:00 AM): You only lose 10% of your gold (capped at 1,000g) and do not lose any items.
Version 1.6 Updates and Known Issues in the Mines
The recent 1.6 update introduced several notably innovative features to the mining experience. One of the most significant additions is the "Mapping Cave Systems" book. This power-up, which can be purchased from the Bookseller or found in treasure chests, grants the player a permanent 50% discount on Marlon's Item Recovery Service. This makes the penalty for fainting much more manageable in the late game.
However, the update also brought some technical challenges. In recent months, players have reported specific Co-op crashes in version 1.6, particularly when using bombs on Floor 120 or during "infested" levels in split-screen mode. If you are playing with friends, it is a popular choice to save your game frequently and perhaps avoid heavy bomb usage on the very last floor of the mines until a stability patch is released.
Additionally, the new Combat Mastery system allows players to unlock powerful trinkets and abilities that change how they interact with mine monsters. These additions ensure that the Mines remain a highly competitive and engaging part of the game even for veteran players who have reached the bottom many times before.
Frequently Asked Questions
Can you go to the mines on Day 1?
No, the path to the Mines is physically blocked by a large boulder and debris until the morning of Spring 5. Even if you use glitches to bypass the map boundaries, the interior of the mine cave is not fully loaded or interactive until the scripted Joja Corp landslide event occurs.
Why is the elevator not working for me?
The elevator is "broken" by default. To activate it, you must manually reach Floor 5 by finding ladders. Once you reach Floor 5, the elevator stop for that floor is unlocked. It will continue to unlock every 5 floors (10, 15, 20, etc.) as you progress deeper.
What is the best way to find ladders quickly?
While there is no single "best" way, a top-rated strategy is to check your Daily Luck on the TV. On "Purple Star" luck days, ladders appear much more frequently. Additionally, killing all enemies on a floor provides a flat bonus to the ladder spawn rate for the remaining rocks.
How do I get a better sword than the Rusty Sword?
You will receive new weapons as rewards for reaching specific milestones. For example, Floor 20 rewards you with the Steel Smallsword. You can also purchase stronger weapons from Marlon at the Adventurer's Guild once you have completed the "Initiation" quest by killing 10 slimes.
What is the blocked path to the right of the entrance?
The cracked rock wall to the right of the mine entrance leads to the Dwarf, a unique merchant. To break this wall, you need either a Steel Pickaxe or a Cherry Bomb. You will also need to find the four Dwarvish Scrolls to understand his language before you can trade with him.
Key Takeaways for Mastering the Mines
Reaching the bottom of the Mines is a significant step forward in any Stardew Valley playthrough. By following these steps, you can ensure a smooth and efficient descent:
- Wait for Spring 5: Don't waste time trying to find the mines earlier; the path is physically blocked until you receive the Joja Corp letter.
- Use the Entrance Chest: Always store your non-essential tools at the mine entrance to maximize your inventory space for ores and gems.
- Prioritize the Elevator: Focus on reaching floors that are multiples of five to "save" your progress and avoid repeating content.
- Watch the Clock: Remember that passing out at 2:00 AM is often less punishing than losing a fight to a monster, as you won't lose your items.
- Upgrade Your Pickaxe: As soon as you have enough copper and iron, upgrade your tools at Clint’s shop to reduce the energy cost of breaking rocks.
- Utilize the 1.6 Buffs: Read the "Mapping Cave Systems" book as soon as possible to cut your item recovery costs in half.
Start your journey today by packing some Field Snacks and heading north to the mountains as soon as the landslide is cleared!