Home
When Do You Unlock the Mines in Stardew Valley and How to Prepare?
In Stardew Valley, the Mines officially unlock on Spring 5, Year 1 . On this morning, you will receive a letter from Morris of Joja Corp explaining that a landslide blocking the mountain path has been cleared. You do not need to complete any quests or pay gold to trigger this event; it is a time-gated mechanic that occurs automatically for every player.
For many new farmers, the first few days in Pelican Town are consumed by clearing weeds, planting parsnips, and meeting the locals. However, the real engine of farm progression lies deep underground. The Mines provide the essential ores—copper, iron, and gold—needed to upgrade your tools and craft advanced machinery like sprinklers and kegs. Understanding exactly when and how to access this area is a significant step toward moving out of the early-game struggle.
While the date is fixed, your success within the Mines depends heavily on how you spend the four days leading up to the unlock. Simply walking into the cave on Day 5 without preparation often leads to rapid energy depletion or an early trip to the local clinic. This guide covers the spatial navigation, strategic preparation, and advanced community tactics required to master the depths.
Where Are the Mines Located on the Stardew Valley Map?
Finding the Mines for the first time can be slightly confusing because the "Mountain" area is quite large. To reach the entrance from your farm, exit through the north path (above your farmhouse). This will lead you to the Mountain map, where you will see Robin’s Carpenter Shop and the tent where Linus lives.
From Robin’s house, head east. You will cross a small wooden bridge and pass the mountain lake. The Mine entrance is a dark cave opening situated in the rock face on the northeastern edge of the lake. It is located just to the west of the Adventurer’s Guild building. If you find yourself at the bridge leading to the Quarry (which is likely broken at this stage), you have gone slightly too far east.
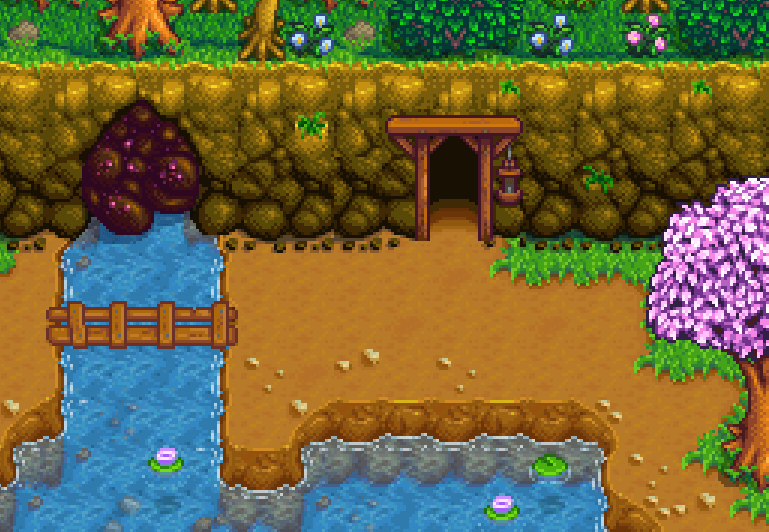
Image source: Stardew Valley Wiki
According to the official Stardew Valley Wiki , the Mines consist of 120 unique floors, each filled with different resources and dangers. The location remains static throughout the game, though the interior layout of the floors resets every time you leave and re-enter, providing a fresh supply of rocks and monsters to encounter.
What Should You Do Before the Mines Open on Day 5?
The four-day window before the landslide is cleared is not just for farming; it is your primary window for resource stockpiling. Most players fail in the mines because they run out of energy (Stamina) within the first ten floors. To avoid this, you must engage in what the community calls the "Field Snack Meta."
The Days 1–4 Preparation Workflow
To ensure you are ready for a deep dive on Day 5, follow this specific sequence of actions during your first week:
- Reach Foraging Level 1: On Days 1 and 2, spend your excess energy chopping down trees on or near your farm. You need to reach Foraging Level 1 as quickly as possible. This level unlocks the crafting recipe for the Field Snack .
- Stockpile Tree Seeds: As you chop trees, you will collect Acorns, Maple Seeds, and Pine Cones. Do not sell these. One of each can be crafted into a Field Snack, which provides +45 Energy. This is widely regarded as one of the most efficient early-game mining foods because the ingredients are essentially free.
- Forage the South Woods: Every day, check the area south of your farm (Cindersap Forest) near the sewer pipe. You can often find Spring Onions growing there. These provide a smaller energy boost (+13 to +33) but are vital for sustaining your work before you have enough seeds for Field Snacks.
- Craft a "Mine Chest": On Day 4, craft a wooden chest and place it right next to the Mine entrance or the elevator. This allows you to dump your inventory (watering can, axe, scythe) before heading down, leaving maximum space for ores, geodes, and monster loot.
How to Survive Your First Trip Into the Mines
When you first enter the Mines on Spring 5, a cutscene will trigger. You will meet Marlon, the leader of the Adventurer’s Guild. Recognizing that you are unarmed, he will gift you a Rusty Sword . While this weapon is weak, it is essential for defending yourself against the Slimes and Green Flies that inhabit the upper floors.
Combat and Resource Gathering
In the early floors (1-20), your primary goal is to gather Copper Ore . You need 20 to 25 Copper Ore to craft your first furnace and eventually upgrade your pickaxe. However, combat can be a distraction. Many players find that killing enemies is actually a "stamina-free" way to find ladders. While breaking rocks costs energy, defeating a Slime has a chance to spawn the exit ladder for free.
According to discussions on the Stardew Valley community forums , the most effective way to survive is to avoid "tanking" hits. Use the sword's knockback to keep Slimes at a distance. If you are cornered by multiple enemies, focus on finding the ladder rather than clearing the room. Your health bar is much harder to replenish than your energy bar in the early game.
| Food Item | Energy Gain | Source | Strategy Note |
|---|---|---|---|
| Spring Onion | +13 to +33 | Foraging (South Forest) | Best for floors 1-10 |
| Field Snack | +45 | Crafting (Lvl 1 Foraging) | Primary fuel for deep dives |
| Salmonberry | +25 | Bushes (Spring 15-18) | Stockpile hundreds for mid-Spring |
| Cave Carrot | +30 | Tilling soil in Mines | Emergency food found on-site |
How Does the Mine Elevator and Progress Saving Work?
One of the most important mechanics to understand is the Elevator . You do not have to start from Floor 1 every time you visit. The elevator acts as a permanent checkpoint system, but it only saves your progress in increments of five floors.
Understanding the 5-Floor Rule
Every time you reach a floor ending in 0 or 5 (e.g., Floor 5, 10, 15), the elevator at the entrance "remembers" that floor. If you reach Floor 4 and have to leave because it's getting late, you will have to start back at Floor 1 the next day. Therefore, you should always aim to complete "5-floor chunks" before exiting. This makes your mining trips much more efficient and prevents wasted energy on repeated floors.
Steel Smallsword
A significant upgrade over the Rusty Sword, making combat much safer.
Slingshot
Allows for ranged combat, though it requires stones or explosive ammo.
Slingshot (Master)
A more powerful version of the standard slingshot.
Obsidian Edge
A top-tier sword that will carry you through the rest of the Mines.
Reaching Floor 120 is the ultimate goal of the mountain mines. At the bottom, you will find the Skull Key , which unlocks the Desert Mines (Skull Cavern) later in the game. The journey is divided into three distinct zones: the Earth floors (1-39), the Frozen floors (40-79), and the Lava floors (80-120). Each zone requires better equipment and more potent healing items.
Advanced Mining Strategies for Maximum Efficiency
Once you understand the basics, you can use advanced community tactics to speed up your progression. These strategies are often used by "min-max" players to reach the bottom of the mines within the first month of the game.
The "0 Gold" Passing Out Strategy
In Stardew Valley, staying out past 2:00 AM causes your character to pass out. Normally, this results in a penalty where you lose 10% of your gold (up to a maximum of 1,000g). However, if you have 0 Gold in your inventory—perhaps because you just spent it all on seeds or tool upgrades—the penalty is zero.
Experienced players will often stay in the mines until the very last second, passing out at 2:00 AM to squeeze every possible bit of ore out of the day. Furthermore, if you level up a skill (like Mining or Combat) on the same night you pass out, you will wake up with a full energy bar the next day, completely bypassing the exhaustion penalty. This is a highly impactful way to maximize your early-game productivity.
Rainy Day Optimization and the Spa Reset
Rainy days are the most valuable days for mining. Because you do not need to water your crops, you start the day with 100% energy and several extra hours of free time. You should prioritize the Mines almost exclusively when it rains in Spring.
Additionally, once Summer 1 arrives, a second landslide is cleared, opening the path to the Railroad and the Spa . The Spa is a top-tier resource for miners. By standing still in the pool, you can refill your entire energy bar for free. A common high-level tactic is to mine until your energy is low, walk to the Spa to reset, and then return to the Mines for a second full session in a single day.
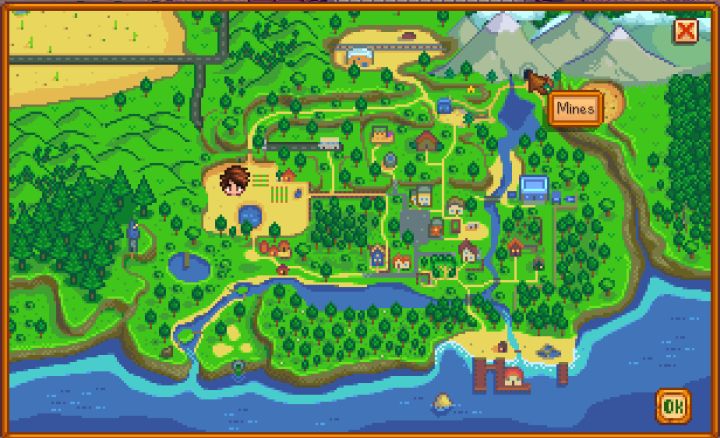
Image source: Carl's Guides
Troubleshooting: Why Are the Mines Still Blocked?
If you have reached Spring 5 and the Mines still appear to be blocked, you are likely experiencing one of two common points of confusion. First, many new players confuse the Mine Landslide with the Railroad Landslide . The rocks blocking the Mines are cleared on Spring 5. The rocks blocking the path further north (leading to the Spa and Train Station) are not cleared until the first day of Summer. If you are looking at the path behind Robin’s house, that will remain blocked for the entire first season.
Second, there is a common myth that you must read the letter from Morris to trigger the unlock. While the letter serves as a notification, the game code clears the rocks regardless of whether you check your mail. If the path is still blocked, double-check your calendar; it is possible you are only on Day 4. In very rare cases, players using mods may experience conflicts that prevent the event from triggering, but in the vanilla game, Spring 5 is the hard-coded date.
Frequently Asked Questions
- Can I enter the mines before Spring 5?
- No. The rocks blocking the entrance are part of the map geometry and cannot be broken with a starter pickaxe. The game is designed to prevent entry until Day 5 to ensure you have had time to learn the basic farming and foraging mechanics first.
- What happens if I lose my sword in the mines?
- If you die and lose your sword, or accidentally trash it, you can visit the Adventurer's Guild next door. Marlon sells various weapons, but you must first complete the "Initiation" quest by killing 10 Slimes to gain entry to the shop. If you haven't finished the quest yet, you'll have to use your scythe or pickaxe as a makeshift weapon, though they are much less effective.
- Do the items in the mines respawn?
- Yes. Every time you leave the Mines and re-enter, the rocks, ores, and monsters on every floor are reset. This allows you to "farm" specific floors for resources. For example, if you need a lot of Copper, you can repeatedly visit floors 15-25 to gather ore, exit, and return to find new nodes.
- Is it better to mine on "Lucky" days?
- Absolutely. On days when the Fortune Teller says the spirits are "very happy," you will find ladders much faster and discover more geodes. On "unlucky" days, you may find yourself breaking every single rock on a floor before the ladder finally appears, which is a massive waste of energy.
- How do I get to the "Dangerous Mines"?
- The Dangerous Mines are an end-game variant featuring much tougher monsters and better loot (like Radioactive Ore). These are not unlocked until you gain access to Mr. Qi’s Walnut Room on Ginger Island and complete the "Danger in the Deep" quest. For your first year, you will only be dealing with the standard version of the Mines.
Key Takeaways for Unlocking the Mines
- The Date: Mark Spring 5 on your calendar as the official start of your mining career.
- Preparation: Reach Foraging Level 1 by Day 4 to unlock the Field Snack recipe.
- Inventory: Leave your farm tools in a chest at the mine entrance to save space for ore.
- Progression: Always aim for 5-floor increments to save your progress via the elevator.
- Energy: Use Spring Onions and Field Snacks to sustain long mining sessions.
- Luck: Only attempt deep dives on days when the TV Fortune Teller predicts good luck.
- Combat: Use the Rusty Sword from Marlon and avoid getting surrounded by Slimes.
Start saving every Acorn and Pine Cone you find today so you can craft enough Field Snacks to reach Floor 20 by the end of your first week.
All trademarks, copyrighted content, and quoted material referenced in this article belong to their respective owners. Brief excerpts are used under fair use (17 U.S.C. § 107) for purposes of commentary, criticism, and informational reporting. This article is not affiliated with or endorsed by ConcernedApe or Chucklefish.