Home
How to Use an Asset Editor for Game Modding and 3D Design
An asset editor is a specialized software utility used to modify, manage, or bridge proprietary file formats within a specific ecosystem, such as Total War modding, Unreal Engine development, or V-Ray rendering. Unlike general-purpose 3D modelers like Blender, these tools are designed to handle game-ready data, including skeletons, textures, and animation metadata, ensuring compatibility with the host application's engine.
Understanding the Role of an Asset Editor in Modern Workflows
In the landscape of digital content creation, the term "asset editor" refers to a diverse category of tools that act as intermediaries. While a 3D artist might create a high-fidelity model in Maya or ZBrush, that model cannot simply be dropped into a game engine like Unreal or a strategy game like Total War without significant translation. The asset editor serves as this translation layer, allowing users to tweak internal attributes that standard modeling software often ignores.
For game modders, an asset editor is often a community-developed utility that unlocks the ability to "kitbash"—the process of taking parts from various existing models and combining them into something new. For professional designers using V-Ray or Maya, the asset editor is a centralized hub for managing scene hierarchies, material bindings, and render settings. Regardless of the specific software, the primary goal remains the same: to provide a structured interface for modifying assets without breaking the underlying technical requirements of the host environment.
As of 2026, these tools have become increasingly sophisticated. Many now include real-time viewports, automated rigging features, and direct integration with version control systems. Understanding how to navigate these interfaces is essential for anyone looking to move beyond basic asset creation into advanced implementation and modding.
Mastering the Total War Asset Editor for Unit Kitbashing
The Total War modding community has developed one of the most prominent examples of this technology. Primarily built on .NET 10 and utilizing a MonoGame-based viewport, the Total War Asset Editor allows users to perform complex 3D manipulations without needing to master professional-grade modeling suites. It is widely regarded as a top choice for creators who want to focus on "kitbashing" rather than sculpting from scratch.
The Technical Logic of Re-Rigging and Bone Mapping
One of the most frequent points of failure for new modders is the rigging process. When you attach a new piece of armor to a model, the game engine needs to know which bone that armor should follow. If a mesh is moved to a new skeleton without a 1:1 bone mapping, the model will often "turn into spaghetti" or experience extreme vertex stretching when the unit begins to move. This occurs because the vertices are still trying to follow bone IDs that no longer exist or have been repositioned.
To prevent this, the Total War Asset Editor includes a "Fit mesh to skeleton" feature. While this automated tool is a strong starting point, expert modders often perform manual mapping for complex Chaos or Norscan models, where asymmetrical features require precise weight painting. By ensuring that every vertex is weighted to the correct bone, you maintain the visual integrity of the asset across all animation states.
Identifying Skeleton Naming Conventions for Modding
Efficiency in the asset editor often comes down to understanding the file structure. In the Total War ecosystem, skeletons are categorized by specific codes that dictate how the model will behave. A practical cheat sheet for these conventions includes:
- hu1: The standard skeleton for male human units.
- hu1b: The skeleton used for female humans and elves, featuring different proportions and gait cycles.
- hu1c: A specialized skeleton for larger, bulkier units like Norscan marauders or Chaos warriors.
Matching your mesh to the correct skeleton type is critical. Attempting to force a
hu1c
mesh onto a
hu1b
skeleton will result in significant clipping and animation errors that are difficult to fix post-export.
Navigating Intellectual Property and EULA Constraints in Modding
While asset editors provide the technical means to create almost anything, modders must remain aware of the legal boundaries established by game publishers. In the Total War: Warhammer community, there is a notable distinction between "Warhammer Fantasy" and "Age of Sigmar" (AoS) assets. According to community guidelines and EULA interpretations, using AoS-specific assets in a Fantasy-based game can lead to mod takedowns by Games Workshop.
Always verify the source of your assets before sharing a mod publicly. Games Workshop maintains strict control over its various IPs. Assets that are unique to the Age of Sigmar setting are generally prohibited in mods for the Total War: Warhammer series, which is based on the older Fantasy Battles setting. Violating these terms can result in your mod being removed from platforms like the Steam Workshop.
Managing Complex 3D Scenes with the Maya Asset Editor
For professional 3D artists, the Maya Asset Editor serves a different but equally vital purpose. It is a management interface designed to handle scene complexity by organizing nodes into logical "assets." This tool uses a two-panel system: the left panel displays the Asset List, while the right panel handles Template Binding.
Template Binding is a notably innovative feature that allows technical directors to map internal node attributes to "published names." This creates a cleaner pipeline for animators and lighters, who only see the attributes they need to interact with rather than hundreds of internal nodes. By using the asset editor to publish only essential attributes, studios can prevent accidental changes to the underlying rig or geometry, ensuring a more stable production environment.
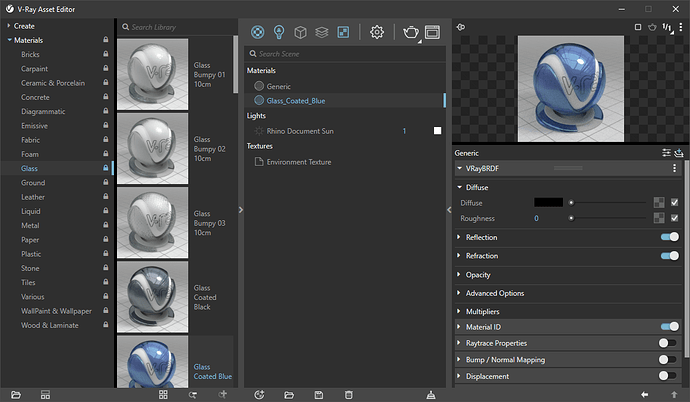
Image source: McNeel Forum
Editing and Unpacking .uasset Files in Unreal Engine
Unreal Engine developers often need to inspect or modify compiled files without opening the full engine suite. The
kaiheilos Utilities
tool is a popular choice for viewing data within
.uasset
,
.uexp
, and
.umap
files. This utility is particularly useful for modders who need to unpack
.pak
files to see how a game's assets are structured.
However, version compatibility is a significant factor when using these utilities. While the tool is exceptionally capable for Unreal Engine versions 4.11 through 4.26, users have reported stability issues and crashes when attempting to use it with Unreal Engine 5.0 and later. This is due to changes in the underlying serialization format of the engine. When working with modern UE5 projects, it is generally recommended to use the engine's built-in Asset Actions or specialized plugins designed for the newer architecture.
Troubleshooting the Blank Asset Editor Bug in V-Ray for SketchUp
A common frustration for V-Ray for SketchUp users is the "Blank Asset Editor" phenomenon. This occurs when the editor window opens but fails to display any materials, lights, or settings. According to reports on the Chaos Forum, this bug is often triggered by legacy textures—specifically
NoiseASGVIS
—that lack modern preview swatches and cause the UI to hang during the loading process.
If you encounter this issue, you can often resolve it by forcing a UI refresh through the SketchUp Ruby Console. This bypasses the hang and reinitializes the editor's connection to the V-Ray service. Use the following command:
Additionally, clearing the SketchUp temporary folder and ensuring that all materials are updated to the latest V-Ray format can prevent the blank screen from recurring. This fix is a top-rated solution for users who find themselves unable to access their render settings in the middle of a project.
Managing Sprite Sheets with the Tibia Assets Editor
In the realm of 2D gaming, the Tibia Assets Editor 2.0 is a specialized tool for managing client assets for Tibia 12+ and 1098. Its primary feature is the Sprite Manager, which allows for the export and re-import of sprite sheets. This is essential for server owners who want to introduce custom items or monsters into their game world.
A critical technical note for this tool involves version conflicts. The Sprite Editor is designed for modern versions of the game; attempting to open legacy assets in the modern editor will typically crash the application. Users must ensure they are using the correct version of the editor for their specific client files to avoid data corruption. The workflow involves exporting the current sprite sheet, modifying it in an external image editor, and then re-importing it while maintaining the correct sprite ID mapping.
Enterprise Asset Management in Broadcom DevTest
Asset editing isn't limited to graphics and games. In the enterprise world, tools like Broadcom DevTest use an asset editor to build and parameterize test cases. This environment offers two distinct modes of operation, each suited to different levels of technical complexity.
Designed for quick configuration of standard assets. It provides a simplified interface for setting up basic connections, such as database strings or simple JMS sessions, without exposing complex underlying parameters.
Allows for deep parameterization and nesting. In this mode, one asset can be used as a parameter for another. For example, a JMS session asset can be nested within a JMS connection asset, creating a modular and reusable testing framework.
By using the Advanced Mode, DevOps engineers can build robust test suites that adapt to different environments (development, staging, production) simply by swapping the top-level asset parameters. This approach significantly reduces the manual effort required to maintain large-scale enterprise testing projects.
Comparing Technical Specifications of Popular Asset Editors
Choosing the right tool depends entirely on your specific use case and technical environment. The following table highlights the key differences between the most widely used asset editors discussed in this article.
| Tool Name | Primary Use Case | Key Feature | Technical Requirement |
|---|---|---|---|
| Total War Asset Editor | Game Modding | 3D Kitbashing & Re-rigging | .NET 10 / MonoGame |
| Maya Asset Editor | Professional 3D Design | Template Binding | Autodesk Maya Environment |
| Unreal Utility (.uasset) | UE Modding/Dev | .pak Unpacking | UE 4.11 - 4.26 Compatibility |
| V-Ray Asset Editor | Architectural Rendering | Material & Light Hub | V-Ray for SketchUp/Rhino |
| DevTest Asset Editor | Enterprise Testing | Nested Parameterization | Broadcom DevTest Suite |
Frequently Asked Questions
A: A 3D modeling tool like Blender or ZBrush is used to create geometry and textures from scratch. In contrast, a game asset editor is a bridge tool designed to modify existing, game-ready files. It handles engine-specific data like bone weights, animation metadata, and proprietary file formats (like .uasset or .pack) that standard modeling software cannot natively edit or export without specialized plugins.
A: You can use third-party utilities such as the kaiheilos Unreal Utilities to view and modify the data within .uasset files. These tools allow you to inspect the hex data, export textures, and even modify certain properties. However, for significant changes to logic or complex meshes, it is generally more reliable to use the Unreal Engine Editor itself to ensure all dependencies and references remain intact.
A: This visual glitch, often called "spaghetti mesh," occurs due to improper bone mapping or rigging. If you add a new piece of geometry to a model but do not correctly assign its vertices to the skeleton's bones, the engine will not know how to move that geometry during animations. You must use the asset editor's rigging tools to map every part of the new mesh to the corresponding bones of the unit's skeleton.
A: Yes, the Total War Asset Editor is an open-source community tool. It is maintained by independent developers (most notably h3ro) and is available for free on platforms like GitHub. It is designed to support the modding community by providing a more accessible alternative to expensive professional 3D software for simple tasks like kitbashing and model swapping.
A:
If the editor appears blank, the first step is to force a UI refresh using the SketchUp Ruby Console command:
VRay::NeUI::SERVICE.refresh_ui
. If the problem persists, check for legacy textures like NoiseASGVIS in your material list, as these are known to cause loading hangs. Ensuring your V-Ray version is up to date and clearing your temporary system files can also resolve persistent loading issues.
Final Thoughts on Mastering Asset Editing Tools
Asset editors are the essential bridges that allow creative visions to function within complex software environments. Whether you are a modder creating new units for a strategy game or a professional artist managing a high-end render, mastering these tools is key to a stable and efficient workflow.
- Match your versions: Always ensure your editor version matches your software version, especially in Unreal and Tibia ecosystems.
- Prioritize rigging: Rigging and bone mapping are the most common points of failure in 3D modding; take the time to map vertices manually for complex models.
- Use UI refresh commands: Keep the V-Ray Ruby Console command handy to bypass common "blank screen" bugs without restarting your project.
- Respect EULA boundaries: Be mindful of intellectual property distinctions, such as the Warhammer Fantasy vs. Age of Sigmar divide, to avoid mod takedowns.
- Leverage Advanced Modes: In enterprise tools like DevTest, use nested parameterization to create more flexible and reusable testing frameworks.
- Backup your files: Always create a backup of your original assets before performing any unpacking or re-rigging operations.
Before starting your next project, verify your skeleton types and ensure your .NET environment is fully updated to support the latest community utilities.